Quantcast
Channel: Ricks Free Auto Repair Advice
Viewing all 2900 articles
Browse latest View live

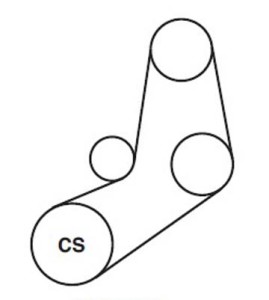
Belt Diagram 2011 Audi A3 2.0 engine

$
0
0

Belt Diagram 2011 Audi A3 2.0 engine

serpentine belt diagram, how to change serpentine belt, belt diagram, belt routing

Got a car question? Click here and send it to me. I’ll do my best to get you an answer.

For more information on this repair or any others for your vehicle, buy an online subscription to either Alldatadiy.com or eautorepair.net. Click on this link to compare the two services: Compare Alldata and Eautorepair.

If you just need information for a single repair and want to save money,eautorepair offers a lower price 1-week subscription for only $11.99. Or, if you’ll be working on this vehicle in the future, you can buy a 1-year subscription (Alldatadiy.com for $26.99, or eautorepair.net $29.99)

© 2012 Rick Muscoplat

Alldatadiy.com

Alldatadiy.com


eautorepair.net

eautorepair.net


Alldata and Eautorepair are both professional grade shop manuals. You’ll find more in-depth information and more complete wiring diagrams, along with descriptions of how the systems work. And, you’ll get all that at a price you can afford. Check them out!

Click HERE to read AUTO REPAIR ARTICLES sorted by topic
Click HERE to read some cool DIAGNOSTIC TIPS
Click HERE to read ACURA articles
Click HERE to read AUDI articles
Click HERE to read BMW articles
Click HERE to read CHRYSLER articles
Click HERE to read DODGE articles
Click HERE to read FORD LINCOLN MERCURY articles
Click HERE to read GM articles
Click HERE to read HONDA articles
Click HERE to read HYUNDAI articles
Click HERE to read INFINITI articles
Click HERE to read JEEP articles
Click HERE to read KIA articles
Click HERE to read MITSUBISHI articles
Click HERE to read NISSAN articles
Click HERE to read SUBURU articles
Click HERE to read TOYOTA articles
Click HERE to read VOLKSWAGEN articles


Belt Diagram 2011 Audi A4 2.0 engine

$
0
0

Belt Diagram 2011 Audi A4 2.0 engine

serpentine belt diagram, how to change serpentine belt, belt diagram, belt routing

Got a car question? Click here and send it to me. I’ll do my best to get you an answer.

For more information on this repair or any others for your vehicle, buy an online subscription to either Alldatadiy.com or eautorepair.net. Click on this link to compare the two services: Compare Alldata and Eautorepair.

If you just need information for a single repair and want to save money,eautorepair offers a lower price 1-week subscription for only $11.99. Or, if you’ll be working on this vehicle in the future, you can buy a 1-year subscription (Alldatadiy.com for $26.99, or eautorepair.net $29.99)

© 2012 Rick Muscoplat

Alldatadiy.com

Alldatadiy.com


eautorepair.net

eautorepair.net


Alldata and Eautorepair are both professional grade shop manuals. You’ll find more in-depth information and more complete wiring diagrams, along with descriptions of how the systems work. And, you’ll get all that at a price you can afford. Check them out!

Click HERE to read AUTO REPAIR ARTICLES sorted by topic
Click HERE to read some cool DIAGNOSTIC TIPS
Click HERE to read ACURA articles
Click HERE to read AUDI articles
Click HERE to read BMW articles
Click HERE to read CHRYSLER articles
Click HERE to read DODGE articles
Click HERE to read FORD LINCOLN MERCURY articles
Click HERE to read GM articles
Click HERE to read HONDA articles
Click HERE to read HYUNDAI articles
Click HERE to read INFINITI articles
Click HERE to read JEEP articles
Click HERE to read KIA articles
Click HERE to read MITSUBISHI articles
Click HERE to read NISSAN articles
Click HERE to read SUBURU articles
Click HERE to read TOYOTA articles
Click HERE to read VOLKSWAGEN articles

P0130

$
0
0

P0130

Oxygen Sensor Circuit Malfunction (Bank 1 Sensor 1). This sensor is located on the engine bank that houses #1 cylinder and is located BEFORE the catalytic converter

The PCM sends a reference voltage (usually 5-volts) to the variable resistor in the oxygen sensor and looks for a return voltage. At during cranking, it expects to see the full reference voltage return to the PCM since a cold oxygen sensor usually doesn’t alter the incoming reference signal until it heats up. If the PCM doesn’t see the expected return voltage, or sees no return voltage, it will set a P0130 code.

oxygen sensor, P0130

oxygen sensor wire colors

Typical causes are: bad oxygen sensor, poor connection either at PCM or O2 sensor, or a break in either wire.

TEST: Unplug the connector to the Oxygen sensor. Turn ignition to RUN. Test for specified reference voltage at the connector coming from the PCM. If you see reference voltage, reconnect to the sensor and test for voltage on the signal wire returning to the PCM. If you don’t get a return voltage the sensor is most likely bad.

To learn how to replace an oxygen sensor, click here

Got a car question? Click here and send it to me. I’ll do my best to get you an answer.

For more information on this repair or any others for your vehicle, buy an online subscription to either Alldatadiy.com or eautorepair.net. Click on this link to compare the two services: Compare Alldata and Eautorepair.

If you just need information for a single repair and want to save money,eautorepair offers a lower price 1-week subscription for only $11.99. Or, if you’ll be working on this vehicle in the future, you can buy a 1-year subscription (Alldatadiy.com for $26.99, or eautorepair.net $29.99)

© 2012 Rick Muscoplat

Alldatadiy.com

Alldatadiy.com


eautorepair.net

eautorepair.net


Alldata and Eautorepair are both professional grade shop manuals. You’ll find more in-depth information and more complete wiring diagrams, along with descriptions of how the systems work. And, you’ll get all that at a price you can afford. Check them out!

Click HERE to read AUTO REPAIR ARTICLES sorted by topic
Click HERE to read some cool DIAGNOSTIC TIPS
Click HERE to read ACURA articles
Click HERE to read AUDI articles
Click HERE to read BMW articles
Click HERE to read CHRYSLER articles
Click HERE to read DODGE articles
Click HERE to read FORD LINCOLN MERCURY articles
Click HERE to read GM articles
Click HERE to read HONDA articles
Click HERE to read HYUNDAI articles
Click HERE to read INFINITI articles
Click HERE to read JEEP articles
Click HERE to read KIA articles
Click HERE to read MITSUBISHI articles
Click HERE to read NISSAN articles
Click HERE to read SUBURU articles
Click HERE to read TOYOTA articles
Click HERE to read VOLKSWAGEN articles

P0131

$
0
0

P0131

Oxygen Sensor Circuit Low Voltage (Bank 1 Sensor 1). This sensor is located on the engine bank that houses #1 cylinder and is located BEFORE the catalytic converter

The PCM sends a reference voltage (usually 5-volts) to the variable resistor in the oxygen sensor and looks for a return voltage. Once the sensor is heated up, the PCM expects to see a varying voltage. If the PCM sees a constant low voltage, it will set a trouble code P0131.

Most common causes are: vacuum leak that’s allowing too much unmetered air into the combustion chamber and causing lean misfires, bad oxygen sensor, poor connection either at PCM or O2 sensor.

oxygen sensor, P0130

oxygen sensor wire colors

TEST: Very difficult to test without either scope or scan tool. The most effective way to determine if you have a vacuum leak is to examine the fuel trim reading on a scan tool. If you have a vacuum leak and the sensor detects a continuous lean exhaust condition, the PCM will add fuel to compensate. Fuel trim should be as low as possible, but never approaching 25%. That would indicate a vacuum leak.

To learn how to replace an oxygen sensor, click here

Got a car question? Click here and send it to me. I’ll do my best to get you an answer.

For more information on this repair or any others for your vehicle, buy an online subscription to either Alldatadiy.com or eautorepair.net. Click on this link to compare the two services: Compare Alldata and Eautorepair.

If you just need information for a single repair and want to save money,eautorepair offers a lower price 1-week subscription for only $11.99. Or, if you’ll be working on this vehicle in the future, you can buy a 1-year subscription (Alldatadiy.com for $26.99, or eautorepair.net $29.99)

© 2012 Rick Muscoplat

Alldatadiy.com

Alldatadiy.com


eautorepair.net

eautorepair.net


Alldata and Eautorepair are both professional grade shop manuals. You’ll find more in-depth information and more complete wiring diagrams, along with descriptions of how the systems work. And, you’ll get all that at a price you can afford. Check them out!

Click HERE to read AUTO REPAIR ARTICLES sorted by topic
Click HERE to read some cool DIAGNOSTIC TIPS
Click HERE to read ACURA articles
Click HERE to read AUDI articles
Click HERE to read BMW articles
Click HERE to read CHRYSLER articles
Click HERE to read DODGE articles
Click HERE to read FORD LINCOLN MERCURY articles
Click HERE to read GM articles
Click HERE to read HONDA articles
Click HERE to read HYUNDAI articles
Click HERE to read INFINITI articles
Click HERE to read JEEP articles
Click HERE to read KIA articles
Click HERE to read MITSUBISHI articles
Click HERE to read NISSAN articles
Click HERE to read SUBURU articles
Click HERE to read TOYOTA articles
Click HERE to read VOLKSWAGEN articles

P0132

$
0
0

P0132

Oxygen Sensor Circuit High Voltage (Bank 1 Sensor 1). This sensor is located on the engine bank that houses #1 cylinder and is located BEFORE the catalytic converter

The PCM sends a reference voltage (usually 5-volts) to the variable resistor in the oxygen sensor and looks for a return voltage. Once the sensor is heated up, the PCM expects to see a varying voltage. If the PCM sees a constant high, it will set a trouble code P0132.

Most common causes are: leaking fuel injector that’s causing an excessive rich condition that can’t be controlled by the PCM, bad oxygen sensor, short from the heater circuit into the sensing circuit. .

oxygen sensor, P0130

oxygen sensor wire colors

To learn how to replace an oxygen sensor, click here

Got a car question? Click here and send it to me. I’ll do my best to get you an answer.

For more information on this repair or any others for your vehicle, buy an online subscription to either Alldatadiy.com or eautorepair.net. Click on this link to compare the two services: Compare Alldata and Eautorepair.

If you just need information for a single repair and want to save money,eautorepair offers a lower price 1-week subscription for only $11.99. Or, if you’ll be working on this vehicle in the future, you can buy a 1-year subscription (Alldatadiy.com for $26.99, or eautorepair.net $29.99)

© 2012 Rick Muscoplat

Alldatadiy.com

Alldatadiy.com


eautorepair.net

eautorepair.net


Alldata and Eautorepair are both professional grade shop manuals. You’ll find more in-depth information and more complete wiring diagrams, along with descriptions of how the systems work. And, you’ll get all that at a price you can afford. Check them out!

Click HERE to read AUTO REPAIR ARTICLES sorted by topic
Click HERE to read some cool DIAGNOSTIC TIPS
Click HERE to read ACURA articles
Click HERE to read AUDI articles
Click HERE to read BMW articles
Click HERE to read CHRYSLER articles
Click HERE to read DODGE articles
Click HERE to read FORD LINCOLN MERCURY articles
Click HERE to read GM articles
Click HERE to read HONDA articles
Click HERE to read HYUNDAI articles
Click HERE to read INFINITI articles
Click HERE to read JEEP articles
Click HERE to read KIA articles
Click HERE to read MITSUBISHI articles
Click HERE to read NISSAN articles
Click HERE to read SUBURU articles
Click HERE to read TOYOTA articles
Click HERE to read VOLKSWAGEN articles

P0133

$
0
0

P0133

Oxygen Sensor Circuit Slow Response (Bank 1 Sensor 1). This sensor is located on the engine bank that houses #1 cylinder and is located BEFORE the catalytic converter

The PCM sends a reference voltage (usually 5-volts) to the variable resistor in the oxygen sensor and looks for a return voltage. It expects to see a rapidly changing return voltage varying from .1-volts to .95-volts. If the voltage doesn’t switch rapidly, the PCM will set a trouble code P0133.

Most common causes are: “Lazy” worn sensor, contaminated sensor, leak in exhaust system

oxygen sensor, P0130

oxygen sensor wire colors

To learn how to replace an oxygen sensor, click here

Got a car question? Click here and send it to me. I’ll do my best to get you an answer.

For more information on this repair or any others for your vehicle, buy an online subscription to either Alldatadiy.com or eautorepair.net. Click on this link to compare the two services: Compare Alldata and Eautorepair.

If you just need information for a single repair and want to save money,eautorepair offers a lower price 1-week subscription for only $11.99. Or, if you’ll be working on this vehicle in the future, you can buy a 1-year subscription (Alldatadiy.com for $26.99, or eautorepair.net $29.99)

© 2012 Rick Muscoplat

Alldatadiy.com

Alldatadiy.com


eautorepair.net

eautorepair.net


Alldata and Eautorepair are both professional grade shop manuals. You’ll find more in-depth information and more complete wiring diagrams, along with descriptions of how the systems work. And, you’ll get all that at a price you can afford. Check them out!

Click HERE to read AUTO REPAIR ARTICLES sorted by topic
Click HERE to read some cool DIAGNOSTIC TIPS
Click HERE to read ACURA articles
Click HERE to read AUDI articles
Click HERE to read BMW articles
Click HERE to read CHRYSLER articles
Click HERE to read DODGE articles
Click HERE to read FORD LINCOLN MERCURY articles
Click HERE to read GM articles
Click HERE to read HONDA articles
Click HERE to read HYUNDAI articles
Click HERE to read INFINITI articles
Click HERE to read JEEP articles
Click HERE to read KIA articles
Click HERE to read MITSUBISHI articles
Click HERE to read NISSAN articles
Click HERE to read SUBURU articles
Click HERE to read TOYOTA articles
Click HERE to read VOLKSWAGEN articles

P0134

$
0
0

P0134

Oxygen Sensor Circuit No Activity Detected (Bank 1 Sensor 1). This sensor is located on the engine bank that houses #1 cylinder and is located BEFORE the catalytic converter

The PCM sends a reference voltage (usually 5-volts) to the variable resistor in the oxygen sensor and looks for a return voltage. It expects to see a rapidly changing return voltage varying from .1-volts to .95-volts. If the PCM detects no switching activity, it will set a trouble code P0134.

Most common causes are: dead sensor, break in wire between PCM and sensor.

oxygen sensor, P0130

oxygen sensor wire colors

To learn how to replace an oxygen sensor, click here

Got a car question? Click here and send it to me. I’ll do my best to get you an answer.

For more information on this repair or any others for your vehicle, buy an online subscription to either Alldatadiy.com or eautorepair.net. Click on this link to compare the two services: Compare Alldata and Eautorepair.

If you just need information for a single repair and want to save money,eautorepair offers a lower price 1-week subscription for only $11.99. Or, if you’ll be working on this vehicle in the future, you can buy a 1-year subscription (Alldatadiy.com for $26.99, or eautorepair.net $29.99)

© 2012 Rick Muscoplat

Alldatadiy.com

Alldatadiy.com


eautorepair.net

eautorepair.net


Alldata and Eautorepair are both professional grade shop manuals. You’ll find more in-depth information and more complete wiring diagrams, along with descriptions of how the systems work. And, you’ll get all that at a price you can afford. Check them out!

Click HERE to read AUTO REPAIR ARTICLES sorted by topic
Click HERE to read some cool DIAGNOSTIC TIPS
Click HERE to read ACURA articles
Click HERE to read AUDI articles
Click HERE to read BMW articles
Click HERE to read CHRYSLER articles
Click HERE to read DODGE articles
Click HERE to read FORD LINCOLN MERCURY articles
Click HERE to read GM articles
Click HERE to read HONDA articles
Click HERE to read HYUNDAI articles
Click HERE to read INFINITI articles
Click HERE to read JEEP articles
Click HERE to read KIA articles
Click HERE to read MITSUBISHI articles
Click HERE to read NISSAN articles
Click HERE to read SUBURU articles
Click HERE to read TOYOTA articles
Click HERE to read VOLKSWAGEN articles

P0135

$
0
0

P0135

Oxygen Sensor Heater Circuit Malfunction (Bank 1 Sensor 1). This sensor is located on the engine bank that houses #1 cylinder and is located BEFORE the catalytic converter

When you turn the ignition switch to RUN, power is provided to the heater circuit of the oxygen sensor. The heater gets its ground from the PCM so it can monitor heater operation. If the heater doesn’t return ground to the PCM, it sets trouble code P0135

Most common causes are: Blown fuse, short to ground, dead heater in sensor, bad ground wire between sensor and PCM.

oxygen sensor, P0130

oxygen sensor wire colors

To learn how to replace an oxygen sensor, click here

Got a car question? Click here and send it to me. I’ll do my best to get you an answer.

For more information on this repair or any others for your vehicle, buy an online subscription to either Alldatadiy.com or eautorepair.net. Click on this link to compare the two services: Compare Alldata and Eautorepair.

If you just need information for a single repair and want to save money,eautorepair offers a lower price 1-week subscription for only $11.99. Or, if you’ll be working on this vehicle in the future, you can buy a 1-year subscription (Alldatadiy.com for $26.99, or eautorepair.net $29.99)

© 2012 Rick Muscoplat

Alldatadiy.com

Alldatadiy.com


eautorepair.net

eautorepair.net


Alldata and Eautorepair are both professional grade shop manuals. You’ll find more in-depth information and more complete wiring diagrams, along with descriptions of how the systems work. And, you’ll get all that at a price you can afford. Check them out!

Click HERE to read AUTO REPAIR ARTICLES sorted by topic
Click HERE to read some cool DIAGNOSTIC TIPS
Click HERE to read ACURA articles
Click HERE to read AUDI articles
Click HERE to read BMW articles
Click HERE to read CHRYSLER articles
Click HERE to read DODGE articles
Click HERE to read FORD LINCOLN MERCURY articles
Click HERE to read GM articles
Click HERE to read HONDA articles
Click HERE to read HYUNDAI articles
Click HERE to read INFINITI articles
Click HERE to read JEEP articles
Click HERE to read KIA articles
Click HERE to read MITSUBISHI articles
Click HERE to read NISSAN articles
Click HERE to read SUBURU articles
Click HERE to read TOYOTA articles
Click HERE to read VOLKSWAGEN articles


P0136

$
0
0

P0136

Oxygen Sensor Heater Circuit Malfunction (Bank 1 Sensor 2). This sensor is located on the engine bank that houses #1 cylinder and is located AFTER the catalytic converter

When you turn the ignition switch to RUN, power is provided to the heater circuit of the oxygen sensor. The heater gets its ground from the PCM so it can monitor heater operation. If the heater doesn’t return ground to the PCM, it sets trouble code P0136

Most common causes are: Blown fuse, short to ground, dead heater in sensor, bad ground wire between sensor and PCM.

oxygen sensor, P0130

oxygen sensor wire colors

To learn how to replace an oxygen sensor, click here

Got a car question? Click here and send it to me. I’ll do my best to get you an answer.

For more information on this repair or any others for your vehicle, buy an online subscription to either Alldatadiy.com or eautorepair.net. Click on this link to compare the two services: Compare Alldata and Eautorepair.

If you just need information for a single repair and want to save money,eautorepair offers a lower price 1-week subscription for only $11.99. Or, if you’ll be working on this vehicle in the future, you can buy a 1-year subscription (Alldatadiy.com for $26.99, or eautorepair.net $29.99)

© 2012 Rick Muscoplat

Alldatadiy.com

Alldatadiy.com


eautorepair.net

eautorepair.net


Alldata and Eautorepair are both professional grade shop manuals. You’ll find more in-depth information and more complete wiring diagrams, along with descriptions of how the systems work. And, you’ll get all that at a price you can afford. Check them out!

Click HERE to read AUTO REPAIR ARTICLES sorted by topic
Click HERE to read some cool DIAGNOSTIC TIPS
Click HERE to read ACURA articles
Click HERE to read AUDI articles
Click HERE to read BMW articles
Click HERE to read CHRYSLER articles
Click HERE to read DODGE articles
Click HERE to read FORD LINCOLN MERCURY articles
Click HERE to read GM articles
Click HERE to read HONDA articles
Click HERE to read HYUNDAI articles
Click HERE to read INFINITI articles
Click HERE to read JEEP articles
Click HERE to read KIA articles
Click HERE to read MITSUBISHI articles
Click HERE to read NISSAN articles
Click HERE to read SUBURU articles
Click HERE to read TOYOTA articles
Click HERE to read VOLKSWAGEN articles

Are HID bulb kits legal or illegal

$
0
0

Are HID bulbs/kits legal or illegal

The Department of Transportation has rigorous standards for headlight assemblies. The regulations detail the beam pattern required for high and low beams. Once a headlight assembly is designed and approved for a particular type of bulb, it is illegal to retrofit it with a different bulb.

Many people buy high intensity discharge (HID) aftermarket kits that claim they’ll retrofit into existing headlight assemblies. Well, they may fit, but they’re not legal if the original assembly was approved for halogen bulbs.

Legal or not, what the big deal?

Ok, so you’re willing to skirt the law and risk a ticket and you want to know what the big deal is, right? Well, first, since the original headlight assemblies were designed for a specific halogen bulb, the focal point of the reflector is curved in such a way as to maximum beam pattern and brightness for that particular bulb. The second you install a different bulb, you change the focal point and beam pattern. In many cases, you will actually cast LESS light on the road if you drop in an HID kit. Yeah, you read that right. You’ll see WORSE with an HID retro-fit kit than you did with the original halogen.

And, because the beam pattern is different than the halogen bulbs, HID kits often cause glare to oncoming traffic and THAT’s how you get caught by the police. The glare gives you away.

Next, since HID bulbs run at a higher temperature, you risk melting or at least distorting the lens and reflector in your headlight assembly. Don’t kid yourself, most factory headlights are molded from plastic. Expose them to too much heat and they distort, giving you EVEN LESS light. Doesn’t that sound like fun?

HID kits notoriously unreliable

HID lights aren’t typical light bulbs. They more like fluorescent bulbs where two electrodes energize a HID bulbgas inside the tube. To build enough voltage to “ignite” the gas, HID kits utilize a ballast—similar to the kinds used in fluorescent light fixtures. When you install an HID kit, you install the ballast near the headlight where it’s exposed to road splash, cold, and heat. You can buy an HID kit for as little as $100 for two bulbs, wiring harness, and ballast. The selling dealer makes about 50% profit on the kit. The manufacture has to limit manufacturing costs to about $10 to justify ship it and make a profit. So you can imagine how little quality you’re getting. So don’t be surprised if the ballast burns up within the first six months.


Is there an alternative?

Many companies make blue bulbs to give the look of HID. But most of those have a painted blue coating. Sylvania makes a combo bulb that incorporates light filtering properties into the bulb to filter out the yellow characteristics of a tungsten bulb and give you a blue cast. Plus, they add a bit of xenon gas. Sylvania zXe bulbThe bulbs cost about $50 for a pack of two and I’ve tried them. They put out more light than regular halogen bulbs, and the light is whiter, so I see better at night.

Got a car question? Click here and send it to me. I’ll do my best to get you an answer.

For more information on this repair or any others for your vehicle, buy an online subscription to either Alldatadiy.com or eautorepair.net. Click on this link to compare the two services: Compare Alldata and Eautorepair.

If you just need information for a single repair and want to save money,eautorepair offers a lower price 1-week subscription for only $11.99. Or, if you’ll be working on this vehicle in the future, you can buy a 1-year subscription (Alldatadiy.com for $26.99, or eautorepair.net $29.99)

© 2012 Rick Muscoplat

Alldatadiy.com

Alldatadiy.com


eautorepair.net

eautorepair.net


Alldata and Eautorepair are both professional grade shop manuals. You’ll find more in-depth information and more complete wiring diagrams, along with descriptions of how the systems work. And, you’ll get all that at a price you can afford. Check them out!

Click HERE to read AUTO REPAIR ARTICLES sorted by topic
Click HERE to read some cool DIAGNOSTIC TIPS
Click HERE to read ACURA articles
Click HERE to read AUDI articles
Click HERE to read BMW articles
Click HERE to read CHRYSLER articles
Click HERE to read DODGE articles
Click HERE to read FORD LINCOLN MERCURY articles
Click HERE to read GM articles
Click HERE to read HONDA articles
Click HERE to read HYUNDAI articles
Click HERE to read INFINITI articles
Click HERE to read JEEP articles
Click HERE to read KIA articles
Click HERE to read MITSUBISHI articles
Click HERE to read NISSAN articles
Click HERE to read SUBURU articles
Click HERE to read TOYOTA articles
Click HERE to read VOLKSWAGEN articles

Interior lights stay on

$
0
0

If you own a GM vehicle and your interior lights stay on even with the doors closed, you may have a faulty door switch or a faulty body control module. Refer to this wiring diagram to see how GM uses a computerized body control module (BCM) to control lighting. Click on the jpg to download a full size PDF.

Click here for full size PDF

Click here for full size PDF

For more information on this repair or any others for your vehicle, buy an online subscription to either Alldatadiy.com or eautorepair.net. Click on this link to compare the two services: Compare Alldata and Eautorepair.

If you just need information for a single repair and want to save money,eautorepair offers a lower price 1-week subscription for only $11.99. Or, if you’ll be working on this vehicle in the future, you can buy a 1-year subscription (Alldatadiy.com for $26.99, or eautorepair.net $29.99)

© 2012 Rick Muscoplat

Alldatadiy.com

Alldatadiy.com


eautorepair.net

eautorepair.net


Alldata and Eautorepair are both professional grade shop manuals. You’ll find more in-depth information and more complete wiring diagrams, along with descriptions of how the systems work. And, you’ll get all that at a price you can afford. Check them out!

Click HERE to read AUTO REPAIR ARTICLES sorted by topic
Click HERE to read some cool DIAGNOSTIC TIPS
Click HERE to read ACURA articles
Click HERE to read AUDI articles
Click HERE to read BMW articles
Click HERE to read CHRYSLER articles
Click HERE to read DODGE articles
Click HERE to read FORD LINCOLN MERCURY articles
Click HERE to read GM articles
Click HERE to read HONDA articles
Click HERE to read HYUNDAI articles
Click HERE to read INFINITI articles
Click HERE to read JEEP articles
Click HERE to read KIA articles
Click HERE to read MITSUBISHI articles
Click HERE to read NISSAN articles
Click HERE to read SUBURU articles
Click HERE to read TOYOTA articles
Click HERE to read VOLKSWAGEN articles

Fix leaking intake manifold gaskets on GM engines

$
0
0

Leaking intake manifold gaskets on GM engines

GM 3.1 and 3.4-liter engines are known for leaking intake manifold gaskets. If you replace the gaskets yourself, there are a few tips and warnings to be aware of.

TIP/WARNING #1:
You’ll have to remove the push rods to lift off the intake manifold. The intake and exhaust push rods are different sizes, so PAY attention to the order in which you remove them. Get a cardboard box and poke holes in it. Insert the push rods into the holes in the exact order you removed them. And make sure you place them back into the engine in the exact locations they came from. Not only that, but keep track of the top and bottom of each push rod. As the engine wears, the push rods, rocker arms, and lifters all develop unique wear patterns. If you swap a push rod with another location, you WILL get noise when re-assembling the engine.

TIP#2:
If you mix up the push rods, here’s how to sort them. Intake push rods have a yellow stripe and 5-3/4″ long. Exhaust push rods have green stripes and are 6″ long.

TIP #3:
There’s an easy way to remove and replace the push rods with a special tool from Lisle tools. This tool compresses the valve spring and allows you to remove the push rod and replace it WITHOUT loosening the rocker arm. That’ll take at least 1-full hour off the repair. Click here to see or buy the tool. The tools is worth every penny.

TIP/WARNING #4:
This is an aluminum alloy engine, so be very careful when cleaning all gasket surfaces. Never (and I mean never) use a metal scraper to remove corrosion or old RTV sealant. Use a plastic scraper.

TIP/WARNING #5:
Use the recommended GM RTV sealant. GM isn’t kidding about this. It’s worth a trip to the dealer to not have to do this repair a second time.

TIP/WARNING #5:
ALWAYS use new intake manifold bolts and follow the torque procedure to the letter. These are plastics intake manifold gaskets and you WILL have a leak if you don’t use new bolts and if you don’t torque them exactly according to procedure

Got a car question? Click here and send it to me. I’ll do my best to get you an answer.

For more information on this repair or any others for your vehicle, buy an online subscription to either Alldatadiy.com or eautorepair.net. Click on this link to compare the two services: Compare Alldata and Eautorepair.

If you just need information for a single repair and want to save money,eautorepair offers a lower price 1-week subscription for only $11.99. Or, if you’ll be working on this vehicle in the future, you can buy a 1-year subscription (Alldatadiy.com for $26.99, or eautorepair.net $29.99)

© 2012 Rick Muscoplat

Alldatadiy.com

Alldatadiy.com


eautorepair.net

eautorepair.net


Alldata and Eautorepair are both professional grade shop manuals. You’ll find more in-depth information and more complete wiring diagrams, along with descriptions of how the systems work. And, you’ll get all that at a price you can afford. Check them out!

Click HERE to read AUTO REPAIR ARTICLES sorted by topic
Click HERE to read some cool DIAGNOSTIC TIPS
Click HERE to read ACURA articles
Click HERE to read AUDI articles
Click HERE to read BMW articles
Click HERE to read CHRYSLER articles
Click HERE to read DODGE articles
Click HERE to read FORD LINCOLN MERCURY articles
Click HERE to read GM articles
Click HERE to read HONDA articles
Click HERE to read HYUNDAI articles
Click HERE to read INFINITI articles
Click HERE to read JEEP articles
Click HERE to read KIA articles
Click HERE to read MITSUBISHI articles
Click HERE to read NISSAN articles
Click HERE to read SUBURU articles
Click HERE to read TOYOTA articles
Click HERE to read VOLKSWAGEN articles

Dead battery on Chevolet Trailblazer

$
0
0

Dead battery on Chevolet Trailblazer

Boy is this a mess. This vehicle has major league problems with battery drain issues. In most cases, it’s either a stuck “ON” relay or a module that won’t “go to sleep.” Then again, GM has had big problems with ignition switches shorting out and providing power to all accessories as if the key had been left in the RUN position.

Here are the possibilities mechanics are finding:

Liftgate module won’t go to sleep
Door lock module won’t go to sleep
Power seat switch shorted
Wiper motor won’t park due to bent arm
Secondary air pump relay stuck ON
Body control module won’t go to sleep

Ignition switch shorted to RUN position.

To diagnose the problem, follow the procedure shown here.

Got a car question? Click here and send it to me. I’ll do my best to get you an answer.

For more information on this repair or any others for your vehicle, buy an online subscription to either Alldatadiy.com or eautorepair.net. Click on this link to compare the two services: Compare Alldata and Eautorepair.

If you just need information for a single repair and want to save money,eautorepair offers a lower price 1-week subscription for only $11.99. Or, if you’ll be working on this vehicle in the future, you can buy a 1-year subscription (Alldatadiy.com for $26.99, or eautorepair.net $29.99)

© 2012 Rick Muscoplat

Alldatadiy.com

Alldatadiy.com


eautorepair.net

eautorepair.net


Alldata and Eautorepair are both professional grade shop manuals. You’ll find more in-depth information and more complete wiring diagrams, along with descriptions of how the systems work. And, you’ll get all that at a price you can afford. Check them out!

Click HERE to read AUTO REPAIR ARTICLES sorted by topic
Click HERE to read some cool DIAGNOSTIC TIPS
Click HERE to read ACURA articles
Click HERE to read AUDI articles
Click HERE to read BMW articles
Click HERE to read CHRYSLER articles
Click HERE to read DODGE articles
Click HERE to read FORD LINCOLN MERCURY articles
Click HERE to read GM articles
Click HERE to read HONDA articles
Click HERE to read HYUNDAI articles
Click HERE to read INFINITI articles
Click HERE to read JEEP articles
Click HERE to read KIA articles
Click HERE to read MITSUBISHI articles
Click HERE to read NISSAN articles
Click HERE to read SUBURU articles
Click HERE to read TOYOTA articles
Click HERE to read VOLKSWAGEN articles

How to Bleed power steering, how to bleed brakes,

$
0
0

Bleed power steering, bleed brakes

If you’ve replaced any part of your hydraulic power steering system and have air bubbles, the factory approved method to bleed it is to use a hand vacuum pump. Car makers no longer recommend turning the steering wheel lock-to-lock. Doing that builds up to 2,000psi and can burst a hose. Plus, it isn’t as effective in getting the air out. The Mitivac kit bleed brakes, bleed power steering, bleed air out of cooling system shown here is a great tool to use for bleeding all vehicle systems, including coolant. And, get the PS adapter. bleed power steering, bleed brakes, bleed air out of cooling system

Got a car question? Click here and send it to me. I’ll do my best to get you an answer.

For more information on this repair or any others for your vehicle, buy an online subscription to either Alldatadiy.com or eautorepair.net. Click on this link to compare the two services: Compare Alldata and Eautorepair.

If you just need information for a single repair and want to save money,eautorepair offers a lower price 1-week subscription for only $11.99. Or, if you’ll be working on this vehicle in the future, you can buy a 1-year subscription (Alldatadiy.com for $26.99, or eautorepair.net $29.99)

© 2012 Rick Muscoplat

Alldatadiy.com

Alldatadiy.com


eautorepair.net

eautorepair.net


Alldata and Eautorepair are both professional grade shop manuals. You’ll find more in-depth information and more complete wiring diagrams, along with descriptions of how the systems work. And, you’ll get all that at a price you can afford. Check them out!

Click HERE to read AUTO REPAIR ARTICLES sorted by topic
Click HERE to read some cool DIAGNOSTIC TIPS
Click HERE to read ACURA articles
Click HERE to read AUDI articles
Click HERE to read BMW articles
Click HERE to read CHRYSLER articles
Click HERE to read DODGE articles
Click HERE to read FORD LINCOLN MERCURY articles
Click HERE to read GM articles
Click HERE to read HONDA articles
Click HERE to read HYUNDAI articles
Click HERE to read INFINITI articles
Click HERE to read JEEP articles
Click HERE to read KIA articles
Click HERE to read MITSUBISHI articles
Click HERE to read NISSAN articles
Click HERE to read SUBURU articles
Click HERE to read TOYOTA articles
Click HERE to read VOLKSWAGEN articles

Belt Diagram 1996 Audi A3 2.8 liter engine

$
0
0

Belt Diagram 1999 Audi A6 2.8 liter engine

Got a car question? Click here and send it to me. I’ll do my best to get you an answer.

For more information on this repair or any others for your vehicle, buy an online subscription to either Alldatadiy.com or eautorepair.net. Click on this link to compare the two services: Compare Alldata and Eautorepair.

If you just need information for a single repair and want to save money,eautorepair offers a lower price 1-week subscription for only $11.99. Or, if you’ll be working on this vehicle in the future, you can buy a 1-year subscription (Alldatadiy.com for $26.99, or eautorepair.net $29.99)

© 2012 Rick Muscoplat

Alldatadiy.com

Alldatadiy.com


eautorepair.net

eautorepair.net


Alldata and Eautorepair are both professional grade shop manuals. You’ll find more in-depth information and more complete wiring diagrams, along with descriptions of how the systems work. And, you’ll get all that at a price you can afford. Check them out!

Click HERE to read AUTO REPAIR ARTICLES sorted by topic
Click HERE to read some cool DIAGNOSTIC TIPS
Click HERE to read ACURA articles
Click HERE to read AUDI articles
Click HERE to read BMW articles
Click HERE to read CHRYSLER articles
Click HERE to read DODGE articles
Click HERE to read FORD LINCOLN MERCURY articles
Click HERE to read GM articles
Click HERE to read HONDA articles
Click HERE to read HYUNDAI articles
Click HERE to read INFINITI articles
Click HERE to read JEEP articles
Click HERE to read KIA articles
Click HERE to read MITSUBISHI articles
Click HERE to read NISSAN articles
Click HERE to read SUBURU articles
Click HERE to read TOYOTA articles
Click HERE to read VOLKSWAGEN articles


No crank, no start, Ford Taurus

$
0
0

No crank, no start Ford Taurus

If run into a situation where you turn the key and the starter doesn’t crank the engine, get out your test light and start checking for voltage at these locations. Click on the jpg to download the wiring diagram of the starter circuit.taurus wiring diagram, start wiring diagram, won't start

Here’s the power flow

From Battery + to #107 40A fuse in the battery junction box. Power flows through fuse #107 to ignition switch and terminal 87 in the starter relay socket.

When IGN switch is turned to START, power flows to fuse #237 in the central junction box under left side of dash. From the fuse, power flows to terminal 85 (control coil) in the starter relay socket. The PCM provides ground to the control coil if the PATS system is in start mode. The relay moves contacts to provide power to the solenoid relay which closes the large contact in the starter and engages the starter motor.

Got a car question? Click here and send it to me. I’ll do my best to get you an answer.

For more information on this repair or any others for your vehicle, buy an online subscription to either Alldatadiy.com or eautorepair.net. Click on this link to compare the two services: Compare Alldata and Eautorepair.

If you just need information for a single repair and want to save money,eautorepair offers a lower price 1-week subscription for only $11.99. Or, if you’ll be working on this vehicle in the future, you can buy a 1-year subscription (Alldatadiy.com for $26.99, or eautorepair.net $29.99)

© 2012 Rick Muscoplat

Alldatadiy.com

Alldatadiy.com


eautorepair.net

eautorepair.net


Alldata and Eautorepair are both professional grade shop manuals. You’ll find more in-depth information and more complete wiring diagrams, along with descriptions of how the systems work. And, you’ll get all that at a price you can afford. Check them out!

Click HERE to read AUTO REPAIR ARTICLES sorted by topic
Click HERE to read some cool DIAGNOSTIC TIPS
Click HERE to read ACURA articles
Click HERE to read AUDI articles
Click HERE to read BMW articles
Click HERE to read CHRYSLER articles
Click HERE to read DODGE articles
Click HERE to read FORD LINCOLN MERCURY articles
Click HERE to read GM articles
Click HERE to read HONDA articles
Click HERE to read HYUNDAI articles
Click HERE to read INFINITI articles
Click HERE to read JEEP articles
Click HERE to read KIA articles
Click HERE to read MITSUBISHI articles
Click HERE to read NISSAN articles
Click HERE to read SUBURU articles
Click HERE to read TOYOTA articles
Click HERE to read VOLKSWAGEN articles

1998 Acura SLX V-6 3.5-l serpentine belt diagram

$
0
0

1998 Acura SLX V-6 3.5-l serpentine belt diagram

serpentine belt diagram, free diagram

Got a car question? Click here and send it to me. I’ll do my best to get you an answer.

For more information on this repair or any others for your vehicle, buy an online subscription to either Alldatadiy.com or eautorepair.net. Click on this link to compare the two services: Compare Alldata and Eautorepair.

If you just need information for a single repair and want to save money,eautorepair offers a lower price 1-week subscription for only $11.99. Or, if you’ll be working on this vehicle in the future, you can buy a 1-year subscription (Alldatadiy.com for $26.99, or eautorepair.net $29.99)

© 2012 Rick Muscoplat

Alldatadiy.com

Alldatadiy.com


eautorepair.net

eautorepair.net


Alldata and Eautorepair are both professional grade shop manuals. You’ll find more in-depth information and more complete wiring diagrams, along with descriptions of how the systems work. And, you’ll get all that at a price you can afford. Check them out!

Click HERE to read AUTO REPAIR ARTICLES sorted by topic
Click HERE to read some cool DIAGNOSTIC TIPS
Click HERE to read ACURA articles
Click HERE to read AUDI articles
Click HERE to read BMW articles
Click HERE to read CHRYSLER articles
Click HERE to read DODGE articles
Click HERE to read FORD LINCOLN MERCURY articles
Click HERE to read GM articles
Click HERE to read HONDA articles
Click HERE to read HYUNDAI articles
Click HERE to read INFINITI articles
Click HERE to read JEEP articles
Click HERE to read KIA articles
Click HERE to read MITSUBISHI articles
Click HERE to read NISSAN articles
Click HERE to read SUBURU articles
Click HERE to read TOYOTA articles
Click HERE to read VOLKSWAGEN articles

1998 Acura CL V-6 3.0-L serpentine belt diagram

$
0
0

1998 Acura CL V-6 3.-L serpentine belt diagram

serpentine belt diagram, how to change serpentine belt, belt diagram, belt routing

Got a car question? Click here and send it to me. I’ll do my best to get you an answer.

For more information on this repair or any others for your vehicle, buy an online subscription to either Alldatadiy.com or eautorepair.net. Click on this link to compare the two services: Compare Alldata and Eautorepair.

If you just need information for a single repair and want to save money,eautorepair offers a lower price 1-week subscription for only $11.99. Or, if you’ll be working on this vehicle in the future, you can buy a 1-year subscription (Alldatadiy.com for $26.99, or eautorepair.net $29.99)

© 2012 Rick Muscoplat

Alldatadiy.com

Alldatadiy.com


eautorepair.net

eautorepair.net


Alldata and Eautorepair are both professional grade shop manuals. You’ll find more in-depth information and more complete wiring diagrams, along with descriptions of how the systems work. And, you’ll get all that at a price you can afford. Check them out!

Click HERE to read AUTO REPAIR ARTICLES sorted by topic
Click HERE to read some cool DIAGNOSTIC TIPS
Click HERE to read ACURA articles
Click HERE to read AUDI articles
Click HERE to read BMW articles
Click HERE to read CHRYSLER articles
Click HERE to read DODGE articles
Click HERE to read FORD LINCOLN MERCURY articles
Click HERE to read GM articles
Click HERE to read HONDA articles
Click HERE to read HYUNDAI articles
Click HERE to read INFINITI articles
Click HERE to read JEEP articles
Click HERE to read KIA articles
Click HERE to read MITSUBISHI articles
Click HERE to read NISSAN articles
Click HERE to read SUBURU articles
Click HERE to read TOYOTA articles
Click HERE to read VOLKSWAGEN articles

No power, P0765, P0770, Camry

$
0
0

No power, P0765, P0770, Camry

Owners of 2002 Toyota Camrys with the 2.4-liter engine and automatic transmission are reporting issues where the vehicle loses power at highway speeds. The following trouble codes may be stored in the PCM

P0765 Shift Solenoid S4
P0770 Shift Solenoid DSL

First, check the resistance on the transmission solenoids. Unplug the transmission harness. Then remove the yellow and blue wires to the transmission case. Then, using a digital multi meter test the resistance on each wire. The reading should be 11-15 ohms. If the solenoid resistance values check out, the problem is caused by an internal issue usually requiring a rebuld.

Got a car question? Click here and send it to me. I’ll do my best to get you an answer.

For more information on this repair or any others for your vehicle, buy an online subscription to either Alldatadiy.com or eautorepair.net. Click on this link to compare the two services: Compare Alldata and Eautorepair.

If you just need information for a single repair and want to save money,eautorepair offers a lower price 1-week subscription for only $11.99. Or, if you’ll be working on this vehicle in the future, you can buy a 1-year subscription (Alldatadiy.com for $26.99, or eautorepair.net $29.99)

© 2012 Rick Muscoplat

Alldatadiy.com

Alldatadiy.com


eautorepair.net

eautorepair.net


Alldata and Eautorepair are both professional grade shop manuals. You’ll find more in-depth information and more complete wiring diagrams, along with descriptions of how the systems work. And, you’ll get all that at a price you can afford. Check them out!

Click HERE to read AUTO REPAIR ARTICLES sorted by topic
Click HERE to read some cool DIAGNOSTIC TIPS
Click HERE to read ACURA articles
Click HERE to read AUDI articles
Click HERE to read BMW articles
Click HERE to read CHRYSLER articles
Click HERE to read DODGE articles
Click HERE to read FORD LINCOLN MERCURY articles
Click HERE to read GM articles
Click HERE to read HONDA articles
Click HERE to read HYUNDAI articles
Click HERE to read INFINITI articles
Click HERE to read JEEP articles
Click HERE to read KIA articles
Click HERE to read MITSUBISHI articles
Click HERE to read NISSAN articles
Click HERE to read SUBURU articles
Click HERE to read TOYOTA articles
Click HERE to read VOLKSWAGEN articles

Stalls and restarts after cooldown, P0230, U0100, GM truck

$
0
0

Stalls and restarts after cooldown, GM truck

If you own a late model Avalance, Silverado, Suburban, Sierra, Denali, or Yukon and experience a problem where the vehicle drives and then just stalls out as if it has run out of gas, well, it has (kinda). This problem can also set a P0230 or U0109 trouble code, and can also show up as a no start after stall.

Shops are reporting problems with the fuel pump control module (FPCM), not the pump itself. Here’s how it works. Rather than run the electric fuel pump at full speed all the time, GM designed a regulator of sorts. The PCM looks at the throttle position sensor, MAF sensor, speedometer, etc. to determine how much fuel to deliver. Then it sends a digital signal to the FPCM to adjust driving voltage to the pump. So, if you can the accelerator, the FPCM commands full pump output.

The most common problems with the FPCM are high resistance and poor ground connections. Start by verifying power to the FPCM. Then, with the key off, check the resistance at the diagnostic link connector between pins 6 and 14. The reading should be about 60-ohms. Next, check the ground for the FPCM. In reality, you should check the condition of the ground while commanding the pump on with a scan tool. Since you probably don’t own a $2,500 scan tool, just assume the ground connection is bad and clean it. Also clean the body to frame ground strap, especially if the problem seems to be ambient temperature heat related. Then apply dielectric grease to the bare metal and reassemble the ground. If the problem goes away, you’ve saved yourself a lot of money.

If that doesn’t fix the problem, you’re probably looking at a new FPCM. In worst case, you’re looking at a new fuel pump

Got a car question? Click here and send it to me. I’ll do my best to get you an answer.

For more information on this repair or any others for your vehicle, buy an online subscription to either Alldatadiy.com or eautorepair.net. Click on this link to compare the two services: Compare Alldata and Eautorepair.

If you just need information for a single repair and want to save money,eautorepair offers a lower price 1-week subscription for only $11.99. Or, if you’ll be working on this vehicle in the future, you can buy a 1-year subscription (Alldatadiy.com for $26.99, or eautorepair.net $29.99)

© 2012 Rick Muscoplat

Alldatadiy.com

Alldatadiy.com


eautorepair.net

eautorepair.net


Alldata and Eautorepair are both professional grade shop manuals. You’ll find more in-depth information and more complete wiring diagrams, along with descriptions of how the systems work. And, you’ll get all that at a price you can afford. Check them out!

Click HERE to read AUTO REPAIR ARTICLES sorted by topic
Click HERE to read some cool DIAGNOSTIC TIPS
Click HERE to read ACURA articles
Click HERE to read AUDI articles
Click HERE to read BMW articles
Click HERE to read CHRYSLER articles
Click HERE to read DODGE articles
Click HERE to read FORD LINCOLN MERCURY articles
Click HERE to read GM articles
Click HERE to read HONDA articles
Click HERE to read HYUNDAI articles
Click HERE to read INFINITI articles
Click HERE to read JEEP articles
Click HERE to read KIA articles
Click HERE to read MITSUBISHI articles
Click HERE to read NISSAN articles
Click HERE to read SUBURU articles
Click HERE to read TOYOTA articles
Click HERE to read VOLKSWAGEN articles

Viewing all 2900 articles
Browse latest View live