Quantcast
Channel: Ricks Free Auto Repair Advice
Viewing all 2900 articles
Browse latest View live

BMW X5 Brake Booster RECALL

$
0
0

BMW X5 RECALL

BMW has issued a safety related recall on 2007-10 X5 sport utility vehicles equipped with V-8 engines. The problem affects 30,000 of those vehicles and is related to a loss of power brakes (yes, that can really ruin your day). This isn’t the first time BMW has had problems with its brakes. In fact, BMW had to recall 200,000 vehicles in 2010 for the exact same problem.

The root cause is failure of the power brake booster. Specifically, the brake booster pump leaks oil into the vacuum hose to the booster unit and that oil degrades the materials in the booster. The hose rises vertically towards the brake booster and that’s the reason BMW didn’t think they had to recall this vehicle along with the others in 2010. They were wrong. The warranty claims for the defective brake booster has forced BMW to turn this into a safety recall.

BMW last year agreed to pay a $3 million dollar fine to the feds because they failed to promptly carry out previous recalls. Nice going BMW. Glad to hear that profits are so good that you can afford to fork out millions for dragging your feet.

Got a car question? Click here and send it to me. I’ll do my best to get you an answer.

For more information on this repair or any others for your vehicle, buy an online subscription to either Alldatadiy.com or eautorepair.net. Click on this link to compare the two services: Compare Alldata and Eautorepair.

If you just need information for a single repair and want to save money,eautorepair offers a lower price 1-week subscription for only $11.99. Or, if you’ll be working on this vehicle in the future, you can buy a 1-year subscription (Alldatadiy.com for $26.99, or eautorepair.net $29.99)

© 2012 Rick Muscoplat

Alldatadiy.com

Alldatadiy.com


eautorepair.net

eautorepair.net


Alldata and Eautorepair are both professional grade shop manuals. You’ll find more in-depth information and more complete wiring diagrams, along with descriptions of how the systems work. And, you’ll get all that at a price you can afford. Check them out!

Click HERE to read AUTO REPAIR ARTICLES sorted by topic
Click HERE to read some cool DIAGNOSTIC TIPS
Click HERE to read ACURA articles
Click HERE to read AUDI articles
Click HERE to read BMW articles
Click HERE to read CHRYSLER articles
Click HERE to read DODGE articles
Click HERE to read FORD LINCOLN MERCURY articles
Click HERE to read GM articles
Click HERE to read HONDA articles
Click HERE to read HYUNDAI articles
Click HERE to read INFINITI articles
Click HERE to read JEEP articles
Click HERE to read KIA articles
Click HERE to read MITSUBISHI articles
Click HERE to read NISSAN articles
Click HERE to read SUBURU articles
Click HERE to read TOYOTA articles
Click HERE to read VOLKSWAGEN articles


Toyota FJ Cruiser Seat Belt recall

$
0
0

Toyota FJ Cruiser Seat Belt recall

Toyota is recalling 310,000 2007-13 FJ Cruiser vehicles due to a seat belt malfunction. The seat belts are failing due to excess wear on the rear doors. Let me explain: The front seat belts are anchored to the rear doors. And the rear door panels aren’t very strong. So cracks can develop in the rear door panels if the door is forcibly closed—like when you’ve got the back seat filled with packages.

If you own one of these vehicles, contact Toyota. Right now they don’t have a fix for the problem

Got a car question? Click here and send it to me. I’ll do my best to get you an answer.

For more information on this repair or any others for your vehicle, buy an online subscription to either Alldatadiy.com or eautorepair.net. Click on this link to compare the two services: Compare Alldata and Eautorepair.

If you just need information for a single repair and want to save money,eautorepair offers a lower price 1-week subscription for only $11.99. Or, if you’ll be working on this vehicle in the future, you can buy a 1-year subscription (Alldatadiy.com for $26.99, or eautorepair.net $29.99)

© 2012 Rick Muscoplat

Alldatadiy.com

Alldatadiy.com


eautorepair.net

eautorepair.net


Alldata and Eautorepair are both professional grade shop manuals. You’ll find more in-depth information and more complete wiring diagrams, along with descriptions of how the systems work. And, you’ll get all that at a price you can afford. Check them out!

Click HERE to read AUTO REPAIR ARTICLES sorted by topic
Click HERE to read some cool DIAGNOSTIC TIPS
Click HERE to read ACURA articles
Click HERE to read AUDI articles
Click HERE to read BMW articles
Click HERE to read CHRYSLER articles
Click HERE to read DODGE articles
Click HERE to read FORD LINCOLN MERCURY articles
Click HERE to read GM articles
Click HERE to read HONDA articles
Click HERE to read HYUNDAI articles
Click HERE to read INFINITI articles
Click HERE to read JEEP articles
Click HERE to read KIA articles
Click HERE to read MITSUBISHI articles
Click HERE to read NISSAN articles
Click HERE to read SUBURU articles
Click HERE to read TOYOTA articles
Click HERE to read VOLKSWAGEN articles

Nissan air bag recall on Altima, Leaf, Pathfinder, Sentra, and Infiniti

$
0
0

Nissan air bag recall on Altima, Leaf, Pathfinder, Sentra, and Infiniti

Nissan has a problem with their airbags shutting down in 2013 Altima, Leaf, Pathfinder, Sentra, and Infiniti JX35 vehicles. The problem is due to malfunctioning sensors in the front passenger seat that would normally turn off the air bags if they detected the weight of a child. But these sensors are shutting down the system even without anybody in the seat. Nissan is working to identify which vehicles got the problem sensors. If you own any of these vehicles, contact your dealer for further instructions.

Got a car question? Click here and send it to me. I’ll do my best to get you an answer.

For more information on this repair or any others for your vehicle, buy an online subscription to either Alldatadiy.com or eautorepair.net. Click on this link to compare the two services: Compare Alldata and Eautorepair.

If you just need information for a single repair and want to save money,eautorepair offers a lower price 1-week subscription for only $11.99. Or, if you’ll be working on this vehicle in the future, you can buy a 1-year subscription (Alldatadiy.com for $26.99, or eautorepair.net $29.99)

© 2012 Rick Muscoplat

Alldatadiy.com

Alldatadiy.com


eautorepair.net

eautorepair.net


Alldata and Eautorepair are both professional grade shop manuals. You’ll find more in-depth information and more complete wiring diagrams, along with descriptions of how the systems work. And, you’ll get all that at a price you can afford. Check them out!

Click HERE to read AUTO REPAIR ARTICLES sorted by topic
Click HERE to read some cool DIAGNOSTIC TIPS
Click HERE to read ACURA articles
Click HERE to read AUDI articles
Click HERE to read BMW articles
Click HERE to read CHRYSLER articles
Click HERE to read DODGE articles
Click HERE to read FORD LINCOLN MERCURY articles
Click HERE to read GM articles
Click HERE to read HONDA articles
Click HERE to read HYUNDAI articles
Click HERE to read INFINITI articles
Click HERE to read JEEP articles
Click HERE to read KIA articles
Click HERE to read MITSUBISHI articles
Click HERE to read NISSAN articles
Click HERE to read SUBURU articles
Click HERE to read TOYOTA articles
Click HERE to read VOLKSWAGEN articles

BMW Electrical recall on 1-series, 3-series sedans and Z4

$
0
0

BMW Electrical recall on 1-series, 3-series sedans and Z4

BMW has issued a recall for 2008-12 1-series, 2007-11 3-series, and 2009-11 Z4 vehicles. The recall involves 297,000 3 Series sedans. The problem is a worn battery cable that causes the engine to shut down. The battery is located in the trunk and can rub against body parts and short out, causing the engine to stall. Contact the dealer for further instructions.

Got a car question? Click here and send it to me. I’ll do my best to get you an answer.

For more information on this repair or any others for your vehicle, buy an online subscription to either Alldatadiy.com or eautorepair.net. Click on this link to compare the two services: Compare Alldata and Eautorepair.

If you just need information for a single repair and want to save money,eautorepair offers a lower price 1-week subscription for only $11.99. Or, if you’ll be working on this vehicle in the future, you can buy a 1-year subscription (Alldatadiy.com for $26.99, or eautorepair.net $29.99)

© 2012 Rick Muscoplat

Alldatadiy.com

Alldatadiy.com


eautorepair.net

eautorepair.net


Alldata and Eautorepair are both professional grade shop manuals. You’ll find more in-depth information and more complete wiring diagrams, along with descriptions of how the systems work. And, you’ll get all that at a price you can afford. Check them out!

Click HERE to read AUTO REPAIR ARTICLES sorted by topic
Click HERE to read some cool DIAGNOSTIC TIPS
Click HERE to read ACURA articles
Click HERE to read AUDI articles
Click HERE to read BMW articles
Click HERE to read CHRYSLER articles
Click HERE to read DODGE articles
Click HERE to read FORD LINCOLN MERCURY articles
Click HERE to read GM articles
Click HERE to read HONDA articles
Click HERE to read HYUNDAI articles
Click HERE to read INFINITI articles
Click HERE to read JEEP articles
Click HERE to read KIA articles
Click HERE to read MITSUBISHI articles
Click HERE to read NISSAN articles
Click HERE to read SUBURU articles
Click HERE to read TOYOTA articles
Click HERE to read VOLKSWAGEN articles

RECALL Acura TSX with manual transmission

$
0
0

RECALL Acura TSX with manual transmission

Acura has issued a recall for 2009-11 Acura TSX L4 models equipped with manual transmissions. The recall involves a software update to change injector and valve timing at cold starts to prevent deposits on the oil control rings. Those deposits can cause excessive oil consumption. Acura will install updated software to fix the problem. The software update takes approximately 20-minutes to complete.Contact the dealer to make an appointment for the service

Got a car question? Click here and send it to me. I’ll do my best to get you an answer.

For more information on this repair or any others for your vehicle, buy an online subscription to either Alldatadiy.com or eautorepair.net. Click on this link to compare the two services: Compare Alldata and Eautorepair.

If you just need information for a single repair and want to save money,eautorepair offers a lower price 1-week subscription for only $11.99. Or, if you’ll be working on this vehicle in the future, you can buy a 1-year subscription (Alldatadiy.com for $26.99, or eautorepair.net $29.99)

© 2012 Rick Muscoplat

Alldatadiy.com

Alldatadiy.com


eautorepair.net

eautorepair.net


Alldata and Eautorepair are both professional grade shop manuals. You’ll find more in-depth information and more complete wiring diagrams, along with descriptions of how the systems work. And, you’ll get all that at a price you can afford. Check them out!

Click HERE to read AUTO REPAIR ARTICLES sorted by topic
Click HERE to read some cool DIAGNOSTIC TIPS
Click HERE to read ACURA articles
Click HERE to read AUDI articles
Click HERE to read BMW articles
Click HERE to read CHRYSLER articles
Click HERE to read DODGE articles
Click HERE to read FORD LINCOLN MERCURY articles
Click HERE to read GM articles
Click HERE to read HONDA articles
Click HERE to read HYUNDAI articles
Click HERE to read INFINITI articles
Click HERE to read JEEP articles
Click HERE to read KIA articles
Click HERE to read MITSUBISHI articles
Click HERE to read NISSAN articles
Click HERE to read SUBURU articles
Click HERE to read TOYOTA articles
Click HERE to read VOLKSWAGEN articles

RECALL Acura MDX for key issue

$
0
0

RECALL Acura MDX for key issue

Acura has issued a recall for all 2003-06 MDX vehicles to correct a situation where the ignition key can be removed with the shift lever in a position other than park. The problem is caused by the driver continually trying to remove the key when the transmission is NOT in park. This action causes excessive wear on the lever. Once the lever wears, the key can be removed even if the lever isn’t in the park position, and if the parking brake isn’t set, the vehicle can roll away.

Acura will inspect the locking and lever system and install either a new interlock lever, interlock lever pin, interlock solenoid screw, interlock lever spring, or solenoid cover. Contact the dealer to make an appointment for inspection and repair

Got a car question? Click here and send it to me. I’ll do my best to get you an answer.

For more information on this repair or any others for your vehicle, buy an online subscription to either Alldatadiy.com or eautorepair.net. Click on this link to compare the two services: Compare Alldata and Eautorepair.

If you just need information for a single repair and want to save money,eautorepair offers a lower price 1-week subscription for only $11.99. Or, if you’ll be working on this vehicle in the future, you can buy a 1-year subscription (Alldatadiy.com for $26.99, or eautorepair.net $29.99)

© 2012 Rick Muscoplat

Alldatadiy.com

Alldatadiy.com


eautorepair.net

eautorepair.net


Alldata and Eautorepair are both professional grade shop manuals. You’ll find more in-depth information and more complete wiring diagrams, along with descriptions of how the systems work. And, you’ll get all that at a price you can afford. Check them out!

Click HERE to read AUTO REPAIR ARTICLES sorted by topic
Click HERE to read some cool DIAGNOSTIC TIPS
Click HERE to read ACURA articles
Click HERE to read AUDI articles
Click HERE to read BMW articles
Click HERE to read CHRYSLER articles
Click HERE to read DODGE articles
Click HERE to read FORD LINCOLN MERCURY articles
Click HERE to read GM articles
Click HERE to read HONDA articles
Click HERE to read HYUNDAI articles
Click HERE to read INFINITI articles
Click HERE to read JEEP articles
Click HERE to read KIA articles
Click HERE to read MITSUBISHI articles
Click HERE to read NISSAN articles
Click HERE to read SUBURU articles
Click HERE to read TOYOTA articles
Click HERE to read VOLKSWAGEN articles

RECALL Acura ILX and ILX Hybrid models for door lock issue

$
0
0

RECALL Acura ILX and ILX Hybrid models for door lock issue

Acura has issued a recall for 2013 Acura ILX and ILX Hybrid models to correct a door lock problem. If the driver or passenger tries to operate the interior door handle while simultaneously operating the power door locks, the door handle release cable may disengage. The door may no longer latch after cable disengagement. Or, the door may latch and close, but then open when the door locks are operated, causing the doo to open unexpectedly.

Contact Acura dealer to make an appointment for a modification of the door lock system to prevent cable disengagement

Got a car question? Click here and send it to me. I’ll do my best to get you an answer.

For more information on this repair or any others for your vehicle, buy an online subscription to either Alldatadiy.com or eautorepair.net. Click on this link to compare the two services: Compare Alldata and Eautorepair.

If you just need information for a single repair and want to save money,eautorepair offers a lower price 1-week subscription for only $11.99. Or, if you’ll be working on this vehicle in the future, you can buy a 1-year subscription (Alldatadiy.com for $26.99, or eautorepair.net $29.99)

© 2012 Rick Muscoplat

Alldatadiy.com

Alldatadiy.com


eautorepair.net

eautorepair.net


Alldata and Eautorepair are both professional grade shop manuals. You’ll find more in-depth information and more complete wiring diagrams, along with descriptions of how the systems work. And, you’ll get all that at a price you can afford. Check them out!

Click HERE to read AUTO REPAIR ARTICLES sorted by topic
Click HERE to read some cool DIAGNOSTIC TIPS
Click HERE to read ACURA articles
Click HERE to read AUDI articles
Click HERE to read BMW articles
Click HERE to read CHRYSLER articles
Click HERE to read DODGE articles
Click HERE to read FORD LINCOLN MERCURY articles
Click HERE to read GM articles
Click HERE to read HONDA articles
Click HERE to read HYUNDAI articles
Click HERE to read INFINITI articles
Click HERE to read JEEP articles
Click HERE to read KIA articles
Click HERE to read MITSUBISHI articles
Click HERE to read NISSAN articles
Click HERE to read SUBURU articles
Click HERE to read TOYOTA articles
Click HERE to read VOLKSWAGEN articles

RECALL Buick LaCrosse and Cadillac SRX

$
0
0

RECALL Buick LaCrosse and Cadillac SRX

GM has issued a recall for 33,700 2013 Buick LaCrosse sedans and Cadillac SRX vehicles due to the risk of a crash. The transmission in these vehicles may slip from manual to automatic mode.

If you own one of these vehicles, contact the dealer for repair

Got a car question? Click here and send it to me. I’ll do my best to get you an answer.

For more information on this repair or any others for your vehicle, buy an online subscription to either Alldatadiy.com or eautorepair.net. Click on this link to compare the two services: Compare Alldata and Eautorepair.

If you just need information for a single repair and want to save money,eautorepair offers a lower price 1-week subscription for only $11.99. Or, if you’ll be working on this vehicle in the future, you can buy a 1-year subscription (Alldatadiy.com for $26.99, or eautorepair.net $29.99)

© 2012 Rick Muscoplat

Alldatadiy.com

Alldatadiy.com


eautorepair.net

eautorepair.net


Alldata and Eautorepair are both professional grade shop manuals. You’ll find more in-depth information and more complete wiring diagrams, along with descriptions of how the systems work. And, you’ll get all that at a price you can afford. Check them out!

Click HERE to read AUTO REPAIR ARTICLES sorted by topic
Click HERE to read some cool DIAGNOSTIC TIPS
Click HERE to read ACURA articles
Click HERE to read AUDI articles
Click HERE to read BMW articles
Click HERE to read CHRYSLER articles
Click HERE to read DODGE articles
Click HERE to read FORD LINCOLN MERCURY articles
Click HERE to read GM articles
Click HERE to read HONDA articles
Click HERE to read HYUNDAI articles
Click HERE to read INFINITI articles
Click HERE to read JEEP articles
Click HERE to read KIA articles
Click HERE to read MITSUBISHI articles
Click HERE to read NISSAN articles
Click HERE to read SUBURU articles
Click HERE to read TOYOTA articles
Click HERE to read VOLKSWAGEN articles


Coolants and DexCool – Should you use it?

$
0
0

Coolant and DexCool – Should you use it?

There’s a guy on yahoo.answers.com that goes on a rant every single time somebody even mentions that they own a GM vehicle or they’re replacing coolant. According to him, DexCool is the worst stuff ever made and he cites the DexCool lawsuit and settlement. His hysteria is over the top. Here’s the scoop on DexCool and coolants in general.

First some history

Most of the older green coolants were silicate based. Their primary job was to prevent freezing. But they also had additives to prevent corrosion. In the case of the green coolants, the silicates deposited on metal surfaces to “PASSIVATE” them. In other words, the silicate coated the metal parts to prevent electrolysis. The problem with silicate is that it’s abrasive, so it was tough on water pump seals. Plus, green coolant didn’t have a long life—max 2-years or 24,000 miles. When car makers switched to aluminum engines and radiators and away from cast iron components, they also switched to long-life coolants. The old rule was that you could add the newer coolants to the old green stuff and all you did was reduce the life of the long-life coolant to that of the old green stuff. Well, history has proven that theory wrong. You CANNOT mix coolants at all (More on that later0>

The DexCool Lawsuit

So GM switch to organic acid technology (OAT) and named that orange coolant Dex-Cool. And, they gave it a 5-year, 100,000 mile lifespan. At the same time, GM also started using plastic intake manifold gaskets with a silicone bead around the ports. For some reason (and NO ONE agrees on why this happens) the gasket material and Dex-Cool interact with one another, causing leaks. The problem is so extensive that it affects just about every 3.1 and 3.4-liter made in the late ‘90’1 and early 2000’s. The repair involved pulling the intake manifold and replacing the gaskets with a re-designed style. At the time, many shop re-used the old intake manifold bolts with the new gaskets and then re-installed DexCool, only to see the gaskets fail again. They blamed DexCool. Wrong!
The problem with these gaskets is that they’re fairly low torque (because they’re plastic). So if you don’t use new bolts and follow the torque directions TO THE LETTER, you’re going to get another leak.
Bottom line is that owners sued GM in a class action and won a settlement to reimburse them for the gasket failures.

So it’s true that DexCool caused gasket leaks, but the real problem was incompatibility between the plastic and the coolant. This issue has now been fixed, and if your GM vehicle has the newer gaskets, DexCool is the recommended coolant.

Other DexCool problems

Shops reported other problems with DexCool engines besides the 3.1 and 3.4-liter engine. Specifically, shops reported sludge buildup in cast iron engines. But after a thorough investigation, it turns out that the only time an engine encountered sludge buildup was if the engine was operated while low on coolant. THEN the DexCool would oxidize against the cast iron and cause iron oxide deposits. The “rusting” does NOT affect newer aluminum engines. So, if you have an older GM engine and are running DexCool and keeping it properly filled, you won’t have the problem.

Enter the new coolants

After GM came out with Dex-Cool, ALL the car makers jumped onto the reformulation bandwagon. Honda came out with a blue low-silicate formula. Others adopted a Hybrid Organic Acid Technology (HOAT). And each company formulated their coolants to work with the types of metals, gaskets, and seals used in each particular engine. The current situation is that you cannot even use a single coolant for an entire manufacturer’s lineup. Ford has several different coolants and you must use the correct coolant in each engine, simply because every engine has a different combination of seals and plastic materials.

Universal coolant? Ba-humbug

The big name coolant manufacturers felt left out of this game and somebody had to make a coolant that could be sold at retail auto parts stores. So the big name brands came out with “universal coolants.” Yeah, guess what? There’s no such thing. I’m not aware of a single car maker that condones the use of a universal coolant in all of their models and engines.

Mixing coolants becomes a HUGE no-no

Remember I talked about the old theory that it was ok to mix coolants? Well, time has proven that theory wrong. Mixing different coolant formulas is a prescription for big time trouble. In fact, Gates (the belt and water pump manufacturer) recently issued a service bulletin warning auto repair shops that their water pump warranties are null and void if the shop uses the wrong coolant or mixes coolants. Gates has seen water pump failures in as short as 7 days, although most other failures won’t show up for a long time. But if you mix coolants, or use the wrong coolant an get a leak or clogged heater core down the road, who’s going to suspect it’s the fault of the coolant.

Bottom line

If someone tells you to use a coolant OTHER than the one recommended by the car maker, DON’T listen. If you have an extended warranty, you will void it. Even if you don’t, you risk major damage. Most engines take less than 2-gallons. Dealer coolant will cost an extra $10/gallon. Why risk engine, radiator, heater core, gasket, water pump, heater tubing, and seal failure to save a lousy $20?

Want to learn more?

Click Here, and Here.

Learn how to check your coolant here

http://www.ricksfreeautorepairadvice.com/repair-topics/cooling-system- service/prevent-damage-to-your-heater-core-and-radiator-by-checking-yo ur-coolant-for-electrolysis

Got a car question? Click here and send it to me. I’ll do my best to get you an answer.

For more information on this repair or any others for your vehicle, buy an online subscription to either Alldatadiy.com or eautorepair.net. Click on this link to compare the two services: Compare Alldata and Eautorepair.

If you just need information for a single repair and want to save money,eautorepair offers a lower price 1-week subscription for only $11.99. Or, if you’ll be working on this vehicle in the future, you can buy a 1-year subscription (Alldatadiy.com for $26.99, or eautorepair.net $29.99)

© 2012 Rick Muscoplat

Alldatadiy.com

Alldatadiy.com


eautorepair.net

eautorepair.net


Alldata and Eautorepair are both professional grade shop manuals. You’ll find more in-depth information and more complete wiring diagrams, along with descriptions of how the systems work. And, you’ll get all that at a price you can afford. Check them out!

Click HERE to read AUTO REPAIR ARTICLES sorted by topic
Click HERE to read some cool DIAGNOSTIC TIPS
Click HERE to read ACURA articles
Click HERE to read AUDI articles
Click HERE to read BMW articles
Click HERE to read CHRYSLER articles
Click HERE to read DODGE articles
Click HERE to read FORD LINCOLN MERCURY articles
Click HERE to read GM articles
Click HERE to read HONDA articles
Click HERE to read HYUNDAI articles
Click HERE to read INFINITI articles
Click HERE to read JEEP articles
Click HERE to read KIA articles
Click HERE to read MITSUBISHI articles
Click HERE to read NISSAN articles
Click HERE to read SUBURU articles
Click HERE to read TOYOTA articles
Click HERE to read VOLKSWAGEN articles

A/C light flashing on GM vehicles

$
0
0

A/C light flashing on GM vehicles

GM has issued a technical service bulletin #09-01-38-004: INFORMATION FOR VEHICLES WITH HVAC CONTROL MODULE A/C AND RECIRCULATION INDICATORS FLASHING. The bulletin applies to the following vehicles:

2008–2010 Buick Enclave
2007–2010 Cadillac Escalade Models
2007–2010 Chevrolet Avalanche, Silverado, Suburban, Tahoe
2009–2010 Chevrolet Traverse
2007–2010 GMC Acadia, Sierra, Yukon, Yukon XL
2007–2010 Saturn OUTLOOK

The A/C light is designed to flash and disallow A/C operation if any of the following conditions are present:

Ambient air temperature (AAT) is too cold (35 degrees or colder)
Vehicle system voltage is less than 9.5 volts
Refrigerant pressure is too low
Refrigerant pressure is too high
Engine coolant temperature (ECT) is too high
Engine is not in RUN
HVAC Control Head is in the OFF position

Fix these issues and try the A/C again

Got a car question? Click here and send it to me. I’ll do my best to get you an answer.

For more information on this repair or any others for your vehicle, buy an online subscription to either Alldatadiy.com or eautorepair.net. Click on this link to compare the two services: Compare Alldata and Eautorepair.

If you just need information for a single repair and want to save money,eautorepair offers a lower price 1-week subscription for only $11.99. Or, if you’ll be working on this vehicle in the future, you can buy a 1-year subscription (Alldatadiy.com for $26.99, or eautorepair.net $29.99)

© 2012 Rick Muscoplat

Alldatadiy.com

Alldatadiy.com


eautorepair.net

eautorepair.net


Alldata and Eautorepair are both professional grade shop manuals. You’ll find more in-depth information and more complete wiring diagrams, along with descriptions of how the systems work. And, you’ll get all that at a price you can afford. Check them out!

Click HERE to read AUTO REPAIR ARTICLES sorted by topic
Click HERE to read some cool DIAGNOSTIC TIPS
Click HERE to read ACURA articles
Click HERE to read AUDI articles
Click HERE to read BMW articles
Click HERE to read CHRYSLER articles
Click HERE to read DODGE articles
Click HERE to read FORD LINCOLN MERCURY articles
Click HERE to read GM articles
Click HERE to read HONDA articles
Click HERE to read HYUNDAI articles
Click HERE to read INFINITI articles
Click HERE to read JEEP articles
Click HERE to read KIA articles
Click HERE to read MITSUBISHI articles
Click HERE to read NISSAN articles
Click HERE to read SUBURU articles
Click HERE to read TOYOTA articles
Click HERE to read VOLKSWAGEN articles

Power steering noisy, overflowing at reservoir, empty power steering, power steering moans

$
0
0

Power steering noisy, overflowing at reservoir

Owners of Ford Focus vehicles may experience noisy power steering, an empty power steering reservoir, or a reservoir that’s overflowing. The problem is caused by air entering the system, whipping the fluid into foam, and then overflowing. Air can enter the system at any connection point.

Start by checking the crimped connections on the power steering hoses. Look for any signs of fluid leak or dampness. Then check the boots at the rack. The inside of the boots should be dry. If there’s fluid inside the boot, the rack seals are leaking and the rack must be replaced.

Most shops that have worked on this problem have discovered leaks in the power steering return hoses. Once they’re replaced and the shop performs an air bleed procedure with a vacuum pump, the problem goes away for good.

Got a car question? Click here and send it to me. I’ll do my best to get you an answer.

For more information on this repair or any others for your vehicle, buy an online subscription to either Alldatadiy.com or eautorepair.net. Click on this link to compare the two services: Compare Alldata and Eautorepair.

If you just need information for a single repair and want to save money,eautorepair offers a lower price 1-week subscription for only $11.99. Or, if you’ll be working on this vehicle in the future, you can buy a 1-year subscription (Alldatadiy.com for $26.99, or eautorepair.net $29.99)

© 2012 Rick Muscoplat

Alldatadiy.com

Alldatadiy.com


eautorepair.net

eautorepair.net


Alldata and Eautorepair are both professional grade shop manuals. You’ll find more in-depth information and more complete wiring diagrams, along with descriptions of how the systems work. And, you’ll get all that at a price you can afford. Check them out!

Click HERE to read AUTO REPAIR ARTICLES sorted by topic
Click HERE to read some cool DIAGNOSTIC TIPS
Click HERE to read ACURA articles
Click HERE to read AUDI articles
Click HERE to read BMW articles
Click HERE to read CHRYSLER articles
Click HERE to read DODGE articles
Click HERE to read FORD LINCOLN MERCURY articles
Click HERE to read GM articles
Click HERE to read HONDA articles
Click HERE to read HYUNDAI articles
Click HERE to read INFINITI articles
Click HERE to read JEEP articles
Click HERE to read KIA articles
Click HERE to read MITSUBISHI articles
Click HERE to read NISSAN articles
Click HERE to read SUBURU articles
Click HERE to read TOYOTA articles
Click HERE to read VOLKSWAGEN articles

Affordable scan tool with live data

$
0
0

Affordable scan tool with live data

You can diagnose and fix your own car, but only if you have the right tools. Stop relying on the auto parts store to scan your vehicle. Because they’ll just tell you to replace whatever part is listed in the trouble code. You need real diagnostic data to find out if the sensor is really bad or actually telling the truth, which means you’ve got an underlying engine air/fuel problem. The only way to get that diagnostic information is from a scan tool that shows LIVE DATA. In the past, those scan tools cost several thousand dollars. But now you can get live data for less than $100.

This Autel scan tool is worth every penny. So quiturbitchin. If you want to get good information to fix your car yourself, pony up $100 and get a good tool

Got a car question? Click here and send it to me. I’ll do my best to get you an answer.

For more information on this repair or any others for your vehicle, buy an online subscription to either Alldatadiy.com or eautorepair.net. Click on this link to compare the two services: Compare Alldata and Eautorepair.

If you just need information for a single repair and want to save money,eautorepair offers a lower price 1-week subscription for only $11.99. Or, if you’ll be working on this vehicle in the future, you can buy a 1-year subscription (Alldatadiy.com for $26.99, or eautorepair.net $29.99)

© 2012 Rick Muscoplat

Alldatadiy.com

Alldatadiy.com


eautorepair.net

eautorepair.net


Alldata and Eautorepair are both professional grade shop manuals. You’ll find more in-depth information and more complete wiring diagrams, along with descriptions of how the systems work. And, you’ll get all that at a price you can afford. Check them out!

Click HERE to read AUTO REPAIR ARTICLES sorted by topic
Click HERE to read some cool DIAGNOSTIC TIPS
Click HERE to read ACURA articles
Click HERE to read AUDI articles
Click HERE to read BMW articles
Click HERE to read CHRYSLER articles
Click HERE to read DODGE articles
Click HERE to read FORD LINCOLN MERCURY articles
Click HERE to read GM articles
Click HERE to read HONDA articles
Click HERE to read HYUNDAI articles
Click HERE to read INFINITI articles
Click HERE to read JEEP articles
Click HERE to read KIA articles
Click HERE to read MITSUBISHI articles
Click HERE to read NISSAN articles
Click HERE to read SUBURU articles
Click HERE to read TOYOTA articles
Click HERE to read VOLKSWAGEN articles

P0420 Catalyst System Efficiency Below Threshold (Bank 1), P0430 – Catalyst System Efficiency Below Threshold (Bank 2)

$
0
0

P0420 Catalyst System Efficiency Below Threshold (Bank 1), P0430 – Catalyst System Efficiency Below Threshold (Bank 2)

When you get a check engine light and come up with a P0420 or P0430 code, your first assumption may be that you need a new catalytic converter. That may be true, but there are tests you should do first. And, you should understand how the system works.

Here’s a quick overview.

The powertrain control module (PCM) takes inputs from the engine coolant temp sensor (ECT), the mass airflow sensor (MAF), and the throttle position sensor (TPS) and calculates how much fuel to add to the incoming air to get a complete burn. Then it checks on inputs from the upstream oxygen sensors (O2) to see how it did with its calculations. Since you’re moving, going up and down hills, accelerating and decelerating, the computer is CONSTANTLY recalculating and the upstream O2 sensor is CONSTANTLY changing—switching back and forth between rich exhaust and lean exhaust. So you have to understand that the PCM is constantly playing “catch-up” to recalculate. That’s just how the system works. If the PCM overshoots and provides too much fuel, that extra fuel gets burned off in the catalytic converter. In other words, the Cat Converter takes care of all the miscalculations. So the downstream O2 sensor, located AFTER the cat converter, should rarely switch between rich and lean. Even if it does, the sweep should be fairly mild.
However, if the downstream O2 sensor starts sweeping between rich and lean, that’s an indication to the PCM that the cat converter isn’t doing its job of cleaning up the PCM’s mistakes.

What goes wrong with a cat converter

You also have to understand how a cat converter works.

P0420, P0430, catalytic converter

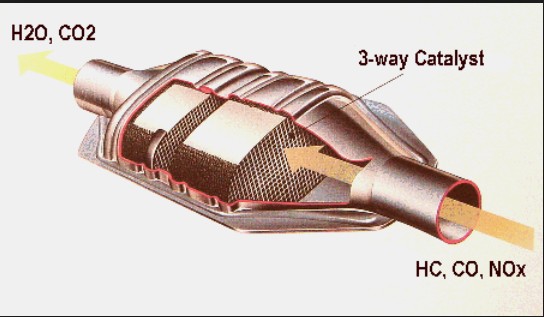
Cut-away of a typical catalytic converter

There’s a ceramic honeycomb inside and the surfaces contain a coating of precious metals
P0420, P0430, catalytic converter, check engine light flashing

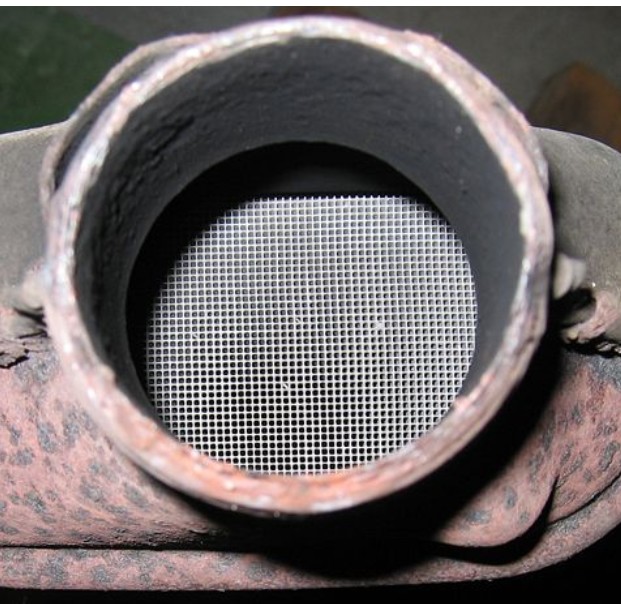
Cat Converter showing honeycomb in good condition

like platinum, Palladium, Rhodium, and other non-precious metals. Those compounds react with unburned fuel in an oxidation/heating process that completes the burn and neutralizes oxides of nitrogen (a component of smog). It’s similar in concept to a municipal garbage burner where they add treat the smoke with extra heat to reduce emissions.

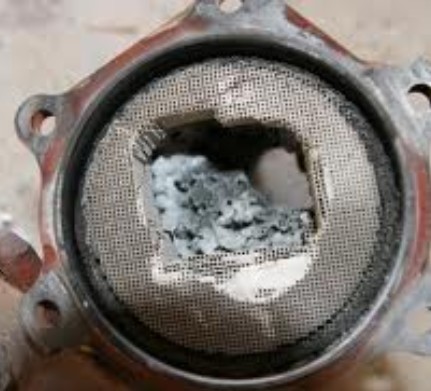
However, if too much unburned fuel enters the cat converter, the oxidation process creates too much heat and the converter starts a runaway reaction. If that continues, it causes a meltdown

P0420, P0430, flashing check engine light

Melted ceramic honeycomb. This is a destroyed converter caused by ignoring engine problems.

where the ceramic honeycomb actually self destructs. Once that happens, the cat converter is toast. The point here is that cat converters don’t die on their own, they’re always murdered. Excess fuel, bad valve stem seals that leak oil into the combustion chamber, coolant leaks that send coolant into the exhaust stream—all of those engine problems can kill a cat converter. If you replace a converter without fixing the underlying problem, you’ll just have to replace it again.

So where to start?

Always start by connecting a scan tool that’s capable of displaying live data. And don’t whine to me that you don’t have one of those. Scan tools have dropped in price and you can get one with live data for less than $100. Click here to buy one. Here’s the lecture: If you want to work on your own car, you must have the right tools. In the old days you had to own a tach/dwell meter and a timing light. So shut up and stop complaining about how you have to buy a scan tool. Either invest in the right tools or take it to the shop and pay them $100 to do a scan.

Now, connect the scan tool, start the engine and let it run until the tool shows that it’s in CLOSED LOOP. That means it’s no longer running off factory programming and is taking information from all the sensors and making its own calculations. Then, have a friend drive the vehicle while you monitor FUEL TRIM readings. Depending on your vehicle, you may be able to monitor both short and long-term fuel trim. Fuel trim is the amount of EXTRA fuel the PCM has to add to keep the engine running properly. In an ideal world with a brand new engine, the short term fuel trim should be 0. But in an older vehicle, a short-term fuel trim reading of 10% is acceptable. The maximum short term fuel trim is 25%. When the PCM exceeds that, it starts boosting long-term fuel trim, so check both. In other words, a low short term fuel trim with a higher long term fuel trim means you have an air/fuel problem.

What causes excessive fuel trim?

The number one villain is a vacuum leak after the MAF sensor has measured how much air is coming into the engine. That causes the upstream O2 sensor to see a continually lean exhaust and it adds fuel to compensate. Plugged fuel injectors, a bad fuel pressure regulator, and a bad fuel pump can also cause a lean condition.
If the fuel trims are in the normal range, next check the upstream O2 sensors. A healthy O2 sensor should switch between rich and lean at least 8-10 times in 10 seconds. Many times a scan tool won’t react that quickly and that may mislead you. So check the scan tool to see if it displays CROSS COUNTS. That metric actually does the counting for you. Professionals use a scope to check for cross counts. If you find that the upstream O2 sensor ISN”T switching that often, you have a “lazy” sensor. That causes the PCM to react too slowly, forcing the cat converter to see too much fuel, then nothing. That causes the downstream sensor to switch between rich and lean and cause a P0420 or P0430 code. Bottom line: if the upstream sensors are lazy, they’ll cause the downstream sensors to switch and make you think the cat converter is bad. Ignore the problem and the cat converter WILL go bad from all the extra fuel. So replace the lazy upstream sensors, clear the codes, and complete another drive cycle. Click here to understand drive cycles.
CLUE: If the upstream O2 and downstream O2 are both switching rapidly, the cat converter isn’t doing its job. A properly operating system should show rapidly switching upstream sensor and a downstream sensor that rarely switches.

If the fuel trims are ok, and you’ve replaced the O2 sensors, confirmed that the fuel pressure is correct, that you have no excessive blow-by, worn valve stem seals, or coolant leaks, you may have to replace the cat converter. Don’t buy a cheap one. It’ll set off the check engine light.

Got a car question? Click here and send it to me. I’ll do my best to get you an answer.

For more information on this repair or any others for your vehicle, buy an online subscription to either Alldatadiy.com or eautorepair.net. Click on this link to compare the two services: Compare Alldata and Eautorepair.

If you just need information for a single repair and want to save money,eautorepair offers a lower price 1-week subscription for only $11.99. Or, if you’ll be working on this vehicle in the future, you can buy a 1-year subscription (Alldatadiy.com for $26.99, or eautorepair.net $29.99)

© 2012 Rick Muscoplat

Alldatadiy.com

Alldatadiy.com


eautorepair.net

eautorepair.net


Alldata and Eautorepair are both professional grade shop manuals. You’ll find more in-depth information and more complete wiring diagrams, along with descriptions of how the systems work. And, you’ll get all that at a price you can afford. Check them out!

Click HERE to read AUTO REPAIR ARTICLES sorted by topic
Click HERE to read some cool DIAGNOSTIC TIPS
Click HERE to read ACURA articles
Click HERE to read AUDI articles
Click HERE to read BMW articles
Click HERE to read CHRYSLER articles
Click HERE to read DODGE articles
Click HERE to read FORD LINCOLN MERCURY articles
Click HERE to read GM articles
Click HERE to read HONDA articles
Click HERE to read HYUNDAI articles
Click HERE to read INFINITI articles
Click HERE to read JEEP articles
Click HERE to read KIA articles
Click HERE to read MITSUBISHI articles
Click HERE to read NISSAN articles
Click HERE to read SUBURU articles
Click HERE to read TOYOTA articles
Click HERE to read VOLKSWAGEN articles

P1762 – Gov Press Sen Offset Volts Too Low or high

$
0
0

P1762 – Gov Press Sen Offset Volts Too Low or high

P1762 relates to transmission governor pressure. Depending on what gear the vehicle is in, the computer expects to see a pressure that’s commanded for that gear. The computer determines that by checking the position of the Park/Neutral switch.

P1762 – Gov Press Sen Offset Volts Too Low or high

P1762 relates to transmission governor pressure. Depending on what gear the vehicle is in, the computer expects to see a pressure that’s commanded for that gear. The computer determines

that by checking the position of the Park/Neutral switch.

Got a car question? Click here and send it to me. I’ll do my best to get you an answer.

For more information on this repair or any others for your vehicle, buy an online subscription to either Alldatadiy.com or eautorepair.net. Click on this link to compare the two services: Compare Alldata and Eautorepair.

If you just need information for a single repair and want to save money,eautorepair offers a lower price 1-week subscription for only $11.99. Or, if you’ll be working on this vehicle in the future, you can buy a 1-year subscription (Alldatadiy.com for $26.99, or eautorepair.net $29.99)

© 2012 Rick Muscoplat

Alldatadiy.com

Alldatadiy.com


eautorepair.net

eautorepair.net


Alldata and Eautorepair are both professional grade shop manuals. You’ll find more in-depth information and more complete wiring diagrams, along with descriptions of how the systems work. And, you’ll get all that at a price you can afford. Check them out!

Click HERE to read AUTO REPAIR ARTICLES sorted by topic
Click HERE to read some cool DIAGNOSTIC TIPS
Click HERE to read ACURA articles
Click HERE to read AUDI articles
Click HERE to read BMW articles
Click HERE to read CHRYSLER articles
Click HERE to read DODGE articles
Click HERE to read FORD LINCOLN MERCURY articles
Click HERE to read GM articles
Click HERE to read HONDA articles
Click HERE to read HYUNDAI articles
Click HERE to read INFINITI articles
Click HERE to read JEEP articles
Click HERE to read KIA articles
Click HERE to read MITSUBISHI articles
Click HERE to read NISSAN articles
Click HERE to read SUBURU articles
Click HERE to read TOYOTA articles
Click HERE to read VOLKSWAGEN articles

P1762 Dodge Durango

$
0
0

P1762 Dodge Durango

If you own a Dodge Durango and have a P1762 trouble code Gov Press Sen Offset Volts Too Low or high, you may be tempted to throw in a new sensor. Whoa partner! Before you do that, check the downstream oxygen sensor (the one AFTER the catalytic converter). That sensor has a heater in it and if the heater shorts to voltage, it’ll feed back into the Powertrain Control Module and bleed over to the governor pressure circuit. That’ll trick you into thinking the governor sensor is at fault. You’ll replace it and STILL have the trouble code.

Start by checking the power and ground to the downstream oxygen sensor (key on, engine off). If that checks out, then check the voltage to the governor pressure sensor. It should be 0.45-0.7 volts. If the reading is outside that range, check the readings on the transmission temperature sensor. If that’s good and the grounds check out ok, THEN replace the governor pressure sensor.

Got a car question? Click here and send it to me. I’ll do my best to get you an answer.

For more information on this repair or any others for your vehicle, buy an online subscription to either Alldatadiy.com or eautorepair.net. Click on this link to compare the two services: Compare Alldata and Eautorepair.

If you just need information for a single repair and want to save money,eautorepair offers a lower price 1-week subscription for only $11.99. Or, if you’ll be working on this vehicle in the future, you can buy a 1-year subscription (Alldatadiy.com for $26.99, or eautorepair.net $29.99)

© 2012 Rick Muscoplat

Alldatadiy.com

Alldatadiy.com


eautorepair.net

eautorepair.net


Alldata and Eautorepair are both professional grade shop manuals. You’ll find more in-depth information and more complete wiring diagrams, along with descriptions of how the systems work. And, you’ll get all that at a price you can afford. Check them out!

Click HERE to read AUTO REPAIR ARTICLES sorted by topic
Click HERE to read some cool DIAGNOSTIC TIPS
Click HERE to read ACURA articles
Click HERE to read AUDI articles
Click HERE to read BMW articles
Click HERE to read CHRYSLER articles
Click HERE to read DODGE articles
Click HERE to read FORD LINCOLN MERCURY articles
Click HERE to read GM articles
Click HERE to read HONDA articles
Click HERE to read HYUNDAI articles
Click HERE to read INFINITI articles
Click HERE to read JEEP articles
Click HERE to read KIA articles
Click HERE to read MITSUBISHI articles
Click HERE to read NISSAN articles
Click HERE to read SUBURU articles
Click HERE to read TOYOTA articles
Click HERE to read VOLKSWAGEN articles


Chrysler Anti-Theft Systems

$
0
0

Chrysler Anti-Theft Systems

Chrysler anti-theft systems have gone through a few iterations. Starting in 1989, Chrysler started installing them on the C, G, and J body styles. The engine controllers in that era were referred to as SMEC (single module engine controller). The SMEC communicated with the body control module (BCM). In anti-theft equipped vehicles, the system would sense when you removed the ignition key. If you then used the remote keyless entry (RKE) to lock the doors, the SECURITY light would flash for 7-secs and then go out. The system was then armed. If the doors were opened without disarming, the horn would honk, parking lights would flash, and the SMEC would turn off the fuel injectors to prevent start-up.

While armed, the security alarm module (SAM) monitors the hood, trunk, door, and ignition switches via a data bus from the BCM. Some of the switches were hard wired to the SAM, others to the BCM. The SAM is programmed to look for a door unlock first. If it sees a hook, trunk, or ignition signal without first seeing a door unlock, it would set off the alarm. The horn is programmed to time out in 3-mins to prevent battery drain and avoid messing with your neighbors. The park and tail lights time out in 15-mins. Disconnecting the battery without first disarming will also set off the alarm system.

WHAT GOES WRONG

If you have a dead battery and you’ve charged it or replaced it, chances are good that the alarm is still in disable mode and you won’t get fuel. To reset the system, close the door and hood. Then lock and unlock the doors with the keyless entry fob or the actual key.

NEXT GENERATION

Chrysler updated the system in 1993 on the LH vehicles by incorporating the SAM module into the BCM. And then got rid of the SECURITY light and instead installed an LED to the middle of the dash. The LED flashes for 15-seconds and then every 30-seconds to alert would-be burglars that the system was armed.

Now here’s where you have to pay attention. Both the SBEC and the BCM of this generation are programmed to look at each other to see if the alarm programming is installed. This matters if you need to replace either component. Here’s the scenario; you grab an SBEC from the junkyard from the exact vehicle as yours, but that vehicle DIDN’T have an alarm. Now you try to install it in your vehicle. The SBEC checks in with the BCM that WAS programmed for alarm. Now you’ve got a problem. The used SBEC will not allow the vehicle to start.

ANOTHER GENERATION

Starting in 1995, Chrysler added another module called the SKIM (security key immobilizer). It works in conjunction with the alarm system. This system uses a transponder key and a transmitter/receiver module in the steering column. When you insert the key, the transmitter sends out a radio frequency. The radio signal is received by the antenna in the key and powers up the chip, which then transmits its unique I.D. code back to the transmitter. If the I.D. code isn’t correct, the vehicle will start and then stall and the security light will flash 6 times. If you repeat the starting procedure with the wrong key, the system will disengage the starter on the 7th attempt. The only way to unlock the system at that point is to use the proper key, or have the system reprogrammed with a factory scan tool or by doing a customer learn procedure.

CUSTOMER LEARN PROCEDURE

If you get a new key from the dealer, here’s how to program the system yourself.

You’ll need TWO working keys

1) Insert one good key in the ignition switch and turn it to ON. Leave in ON for 3-secs., and then turn it to OFF.
2) Insert the second good key and turn to ON. You must insert both keys withing 15-secs. After 10-secs. in the ON position, the security light will flash and the chime will ring one time.
3) Within 50-secs, remove the 2nd key and install the new blank key. Turn to ON.
4) Wait until you hear another chime and watch for the security light to stop flashing. Once the light glows steady for 3-secs, you can remove the new key. The key and the system are now programmed.

The system allows up to 5 keys to be programmed to one vehicle. If you replace the BCM, you must enable the alarm. On 1996-2000 minivans, follow this procedure: Open the hood and then cycle the key in the liftgate. On 1994-1997 LH vehicles, the system is self enabling. On all other, you need a factory scan tool

Got a car question? Click here and send it to me. I’ll do my best to get you an answer.

For more information on this repair or any others for your vehicle, buy an online subscription to either Alldatadiy.com or eautorepair.net. Click on this link to compare the two services: Compare Alldata and Eautorepair.

If you just need information for a single repair and want to save money,eautorepair offers a lower price 1-week subscription for only $11.99. Or, if you’ll be working on this vehicle in the future, you can buy a 1-year subscription (Alldatadiy.com for $26.99, or eautorepair.net $29.99)

© 2012 Rick Muscoplat

Alldatadiy.com

Alldatadiy.com


eautorepair.net

eautorepair.net


Alldata and Eautorepair are both professional grade shop manuals. You’ll find more in-depth information and more complete wiring diagrams, along with descriptions of how the systems work. And, you’ll get all that at a price you can afford. Check them out!

Click HERE to read AUTO REPAIR ARTICLES sorted by topic
Click HERE to read some cool DIAGNOSTIC TIPS
Click HERE to read ACURA articles
Click HERE to read AUDI articles
Click HERE to read BMW articles
Click HERE to read CHRYSLER articles
Click HERE to read DODGE articles
Click HERE to read FORD LINCOLN MERCURY articles
Click HERE to read GM articles
Click HERE to read HONDA articles
Click HERE to read HYUNDAI articles
Click HERE to read INFINITI articles
Click HERE to read JEEP articles
Click HERE to read KIA articles
Click HERE to read MITSUBISHI articles
Click HERE to read NISSAN articles
Click HERE to read SUBURU articles
Click HERE to read TOYOTA articles
Click HERE to read VOLKSWAGEN articles

Intermittent electrical problems on Dodge Caravan

$
0
0

Dodge Caravan electrical issues.

These vans are known for having weird electrical issues. Some are caused by corrosion in the Integrated Power Module under the hood, others are caused by a shorted module on the high speed data bus, and still other are caused by good old corrosion on the ground connections. If your van has crazy electrical problems like interior lights that flash, or power door locks that open by themselves, or the rear wiper suddenly starts working even though the switch is in the off position, you may have a toasted body control module (BCM).

Why do I think that?

Unlike in the old days where switches actually turned power on and off to each accessories, switches in newer vehicles just acts as a signal to the BCM. The BCM either switches power or sends a data signal to the Integrated Power Module or Totally Integrated Power Module and the power switching is done there by the front power module (FPM). Given the corrosion problems in the IPM, TIPM, or FPM, you could easily assume they’re at fault. And they may be. But the commands come from the BCM, so you should always start there. And the first test is for good power and grounds for the BCM. You must test for good ground under load.

And a common culprit is the ground point located at the base of the B pillar. That’s the one on the passenger side between the front door and the sliding door. Don’t know how to test it under load? No problem. Just remove the plastic trim. Located the ground screw. Remove it and clean the corrosion. Then lightly coat the newly cleaned metal with dielectric grease. Then reconnect the ground and see if the problem goes away. In many cases, that solves the problem. If it doesn’t, head for the IPM, TIPM, or FPM.

Got a car question? Click here and send it to me. I’ll do my best to get you an answer.

For more information on this repair or any others for your vehicle, buy an online subscription to either Alldatadiy.com or eautorepair.net. Click on this link to compare the two services: Compare Alldata and Eautorepair.

If you just need information for a single repair and want to save money,eautorepair offers a lower price 1-week subscription for only $11.99. Or, if you’ll be working on this vehicle in the future, you can buy a 1-year subscription (Alldatadiy.com for $26.99, or eautorepair.net $29.99)

© 2012 Rick Muscoplat

Alldatadiy.com

Alldatadiy.com


eautorepair.net

eautorepair.net


Alldata and Eautorepair are both professional grade shop manuals. You’ll find more in-depth information and more complete wiring diagrams, along with descriptions of how the systems work. And, you’ll get all that at a price you can afford. Check them out!

Click HERE to read AUTO REPAIR ARTICLES sorted by topic
Click HERE to read some cool DIAGNOSTIC TIPS
Click HERE to read ACURA articles
Click HERE to read AUDI articles
Click HERE to read BMW articles
Click HERE to read CHRYSLER articles
Click HERE to read DODGE articles
Click HERE to read FORD LINCOLN MERCURY articles
Click HERE to read GM articles
Click HERE to read HONDA articles
Click HERE to read HYUNDAI articles
Click HERE to read INFINITI articles
Click HERE to read JEEP articles
Click HERE to read KIA articles
Click HERE to read MITSUBISHI articles
Click HERE to read NISSAN articles
Click HERE to read SUBURU articles
Click HERE to read TOYOTA articles
Click HERE to read VOLKSWAGEN articles

Push rod removal tool

$
0
0

Push rod removal tool

intake gasket, leaking coolant, push rod removal toolIf you’re working on the intake manifold gaskets on a GM 3.1 or 3.4-liter engine, you’ll have to remove the push rods in order to remove the intake manifold. The traditional way to do that is to loosen all the rocker arms first. Then you have to go through the whole procedure of tightening them down again. This tool saves you ALL that time. Just install the tool on the rocker arm and slowly compress the valve. Pull out the push rod and SLOWLY release the rocker arm. Do NOT let it snap closed or you can damage the
valve.

This tool is worth every penny. It saves a ton of time.

FYI–Get a cardboard box and jam each push rod into the cardboard to Keep them in the same order they came out of the engine. The intake and exhaust push rods are a DIFFERENT length. Plus, they MUST go back in the same place or you’ll get clicking noise from mis-mated wear patterns.

Got a car question? Click here and send it to me. I’ll do my best to get you an answer.

For more information on this repair or any others for your vehicle, buy an online subscription to either Alldatadiy.com or eautorepair.net. Click on this link to compare the two services: Compare Alldata and Eautorepair.

If you just need information for a single repair and want to save money,eautorepair offers a lower price 1-week subscription for only $11.99. Or, if you’ll be working on this vehicle in the future, you can buy a 1-year subscription (Alldatadiy.com for $26.99, or eautorepair.net $29.99)

© 2012 Rick Muscoplat

Alldatadiy.com

Alldatadiy.com


eautorepair.net

eautorepair.net


Alldata and Eautorepair are both professional grade shop manuals. You’ll find more in-depth information and more complete wiring diagrams, along with descriptions of how the systems work. And, you’ll get all that at a price you can afford. Check them out!

Click HERE to read AUTO REPAIR ARTICLES sorted by topic
Click HERE to read some cool DIAGNOSTIC TIPS
Click HERE to read ACURA articles
Click HERE to read AUDI articles
Click HERE to read BMW articles
Click HERE to read CHRYSLER articles
Click HERE to read DODGE articles
Click HERE to read FORD LINCOLN MERCURY articles
Click HERE to read GM articles
Click HERE to read HONDA articles
Click HERE to read HYUNDAI articles
Click HERE to read INFINITI articles
Click HERE to read JEEP articles
Click HERE to read KIA articles
Click HERE to read MITSUBISHI articles
Click HERE to read NISSAN articles
Click HERE to read SUBURU articles
Click HERE to read TOYOTA articles
Click HERE to read VOLKSWAGEN articles

Turn signals don’t flash

$
0
0

Turn signals don’t flash

GM vehicles may exhibit a problem with the turn signals not flashing. The power to the turns signals flows from the TURN LPS fuse (10A) located in the left instrument panel junction through the timer/flasher located inside the hazard switch, and then to the turn signal/wiper switch located on the steering column. As in any electrical system problem, you should always start by checking the fuse. Pull the fuse and check its condition. Then check the voltage on the fuse box terminals with the fuse out. One terminal should read battery voltage and the other terminal should show no voltage. If the powered terminal shows less than battery voltage, that’s an indication the ignition switch is faulty.

The ignition switches in mid-to-late ‘90’s and early 2000 GM vehicles are a known problem. They have a fairly high failure rate and can act out by putting out less than full battery voltage or cutting off power intermittently, causing stalling or no start.

If the fuse terminal shows full battery power, the hazard switch is the next culprit in the chain. This is also a high failure rate item. Since the flasher/timer is located inside the hazard switch, it can fail, causing the turn signals to light but not flash. Hazard switches are fairly inexpensive (click here to read more about them) but difficult to diagnose. Most times it’s easier just to replace the hazard switch to eliminate it as a cause. If the problem persists, you’ll need a wiring diagram. Subscribe to alldatadiy.com or eautorepair.net and download one.

Got a car question? Click here and send it to me. I’ll do my best to get you an answer.

For more information on this repair or any others for your vehicle, buy an online subscription to either Alldatadiy.com or eautorepair.net. Click on this link to compare the two services: Compare Alldata and Eautorepair.

If you just need information for a single repair and want to save money,eautorepair offers a lower price 1-week subscription for only $11.99. Or, if you’ll be working on this vehicle in the future, you can buy a 1-year subscription (Alldatadiy.com for $26.99, or eautorepair.net $29.99)

© 2012 Rick Muscoplat

Alldatadiy.com

Alldatadiy.com


eautorepair.net

eautorepair.net


Alldata and Eautorepair are both professional grade shop manuals. You’ll find more in-depth information and more complete wiring diagrams, along with descriptions of how the systems work. And, you’ll get all that at a price you can afford. Check them out!

Click HERE to read AUTO REPAIR ARTICLES sorted by topic
Click HERE to read some cool DIAGNOSTIC TIPS
Click HERE to read ACURA articles
Click HERE to read AUDI articles
Click HERE to read BMW articles
Click HERE to read CHRYSLER articles
Click HERE to read DODGE articles
Click HERE to read FORD LINCOLN MERCURY articles
Click HERE to read GM articles
Click HERE to read HONDA articles
Click HERE to read HYUNDAI articles
Click HERE to read INFINITI articles
Click HERE to read JEEP articles
Click HERE to read KIA articles
Click HERE to read MITSUBISHI articles
Click HERE to read NISSAN articles
Click HERE to read SUBURU articles
Click HERE to read TOYOTA articles
Click HERE to read VOLKSWAGEN articles

Wipers don’t work Grand Caravan

$
0
0

Wipers don’t work Grand Caravan

Don’t you long for the old days when a switch actually controlled the device you wanted to turn on and off? Well, kiss those days goodbye. If you own a Dodge Grand Caravan, or other Chrysler products, and have a problem with the wipers or other similar accessories, you must first understand how these systems work.

First, the switch does NOT connect or disconnect power to the accessory. Its job is to provide a signal to the body control module (BCM), informing it that the driver wants to operate an accessory. Now some of these switches actually connect or disconnect low voltage (usually 5-volts) to the control module. But the wiper switch contains resistors that alter the voltage over 4 or 5 steps going to the controller. Based on the changed voltage, the controller then knows what to do.

So, let’s trace the wiper circuit on this Dodge Caravan.

wiring diagram, wiper wiring diagram, wiper don't work

Wiper Wiring Diagram. Click to download PDF

Power flows to the control coil side of the front wiper ON/OFF relay from a fuse that’s hot all the time. The control coil now has power, but no ground. The front control module (FCM) housed in the Integrated Power Module (IPM) or Totally Integrated Power Module (TIPM—used in later models) is what provides the ground to the ON/OFF relay. What tells the FCM to provide ground? A DIGITAL signal sent over the data bus from the control module to the FCM. So the FCM gets a digital command and grounds the control coil on the ON/OFF relay and to hot electrical contact in the switching portion of the High/Low relay. The High/Low defaults to the low speed when the control coil is NOT energized, so you get low speed operation.

When the driver switches the Multifunction Switch (MFS) to HIGH, the controller sees the request, sends a digital signal to the FCM, and the FCM provides ground to the control coil of the High/Low relay. The contacts move and power is switched to the high speed wire going to the wiper motor.

What goes wrong.

First, check the fuse to the front wiper ON/OFF relay. Next, check the fuse to the accessory relay that powers the FCM. If those are good, remove the ON/OFF relay and jumper across terminals 87A and 30 in the relay socket. That’ll bypass the FCM. You should heat the High/Low relay click and the wipers should operate in low speed. If you don’t get that, jumper across terminals 87A and 30 in the High/Low relay as well. You have now bypassed the wiper switch and ALL other the digital connections. If the wiper motor works, you’ve confirmed the motor and wiring to the motor are good.

Now, turn the wiper switch to LOW and check for ground at terminal 86 in the wiper ON/OFF relay socket. If you get ground, that confirms the FCM is receiving digital data from the controller and is acting properly. If you don’t get ground, the problem can be a faulty FCM, a corroded IPM or TIPM (very common) or a short in the data bus.

Diagnosing the MFS

As I mentioned, the MFS doesn’t switch power to the wiper motor. It receives a voltage from the BCM and runs that voltage through a series of resistors to alter the voltage going back to the BCM. Disconnect the electrical connector to the MFS and connect a DVOM on the OHMS setting to the brown/yellow and violet/blue wires going to the MFS. You should see a different reading for each click on the MFS stalk. A changing reading confirms that the MFS is working, leaving a bad BCM or a short on the data bus. At that point you’ll need some high end diagnostic equipment.

Got a car question? Click here and send it to me. I’ll do my best to get you an answer.

For more information on this repair or any others for your vehicle, buy an online subscription to either Alldatadiy.com or eautorepair.net. Click on this link to compare the two services: Compare Alldata and Eautorepair.

If you just need information for a single repair and want to save money,eautorepair offers a lower price 1-week subscription for only $11.99. Or, if you’ll be working on this vehicle in the future, you can buy a 1-year subscription (Alldatadiy.com for $26.99, or eautorepair.net $29.99)

© 2012 Rick Muscoplat

Alldatadiy.com

Alldatadiy.com

eautorepair.net

eautorepair.net

Alldata and Eautorepair are both professional grade shop manuals. You’ll find more in-depth information and more complete wiring diagrams, along with descriptions of how the systems work. And, you’ll get all that at a price you can afford. Check them out!

Click HERE to read AUTO REPAIR ARTICLES sorted by topic
Click HERE to read some cool DIAGNOSTIC TIPS
Click HERE to read ACURA articles
Click HERE to read AUDI articles
Click HERE to read BMW articles
Click HERE to read CHRYSLER articles
Click HERE to read DODGE articles
Click HERE to read FORD LINCOLN MERCURY articles
Click HERE to read GM articles
Click HERE to read HONDA articles
Click HERE to read HYUNDAI articles
Click HERE to read INFINITI articles
Click HERE to read JEEP articles
Click HERE to read KIA articles
Click HERE to read MITSUBISHI articles
Click HERE to read NISSAN articles
Click HERE to read SUBURU articles
Click HERE to read TOYOTA articles
Click HERE to read VOLKSWAGEN articles

Viewing all 2900 articles
Browse latest View live